╰┈➤ ✕ ❛ 𝗧𝟭; 𝘁𝗵𝗲 𝗯𝗮𝘀𝗶𝗰𝘀 ❜

𝑯𝑼 𝑻𝑨𝑶. 👻 𝑇𝑈𝑇𝑂𝑅𝐼𝐴𝐿𝑆
》♦ ❛ 𝙩𝙝𝙚 𝙗𝙖𝙨𝙞𝙘𝙨

(\__/)
(>'.'<)
(")_(")

⸝⸝ ʚ 🪓 ! ⌗ °• ━━━━━━━━━
╰┈➤ i use ibis paint x for all of my graphic needs. it's the only thing i know how to use, and it's perfect for me! 1. it's free! well... mostly anyway. i use it free. you will never see me pay for anything. 2. it is available on: apple, android and pc!
please keep in mind, i do not use my laptop for graphics unless i make mood boards, psds, or gifs. i only use my phone to make graphics.
𝑮𝑬𝑻𝑻𝑰𝑵𝑮 𝑺𝑻𝑨𝑹𝑻𝑬𝑫
⸝⸝ ʚ 🪓 ! ⌗ °• ━━━━━━━━━
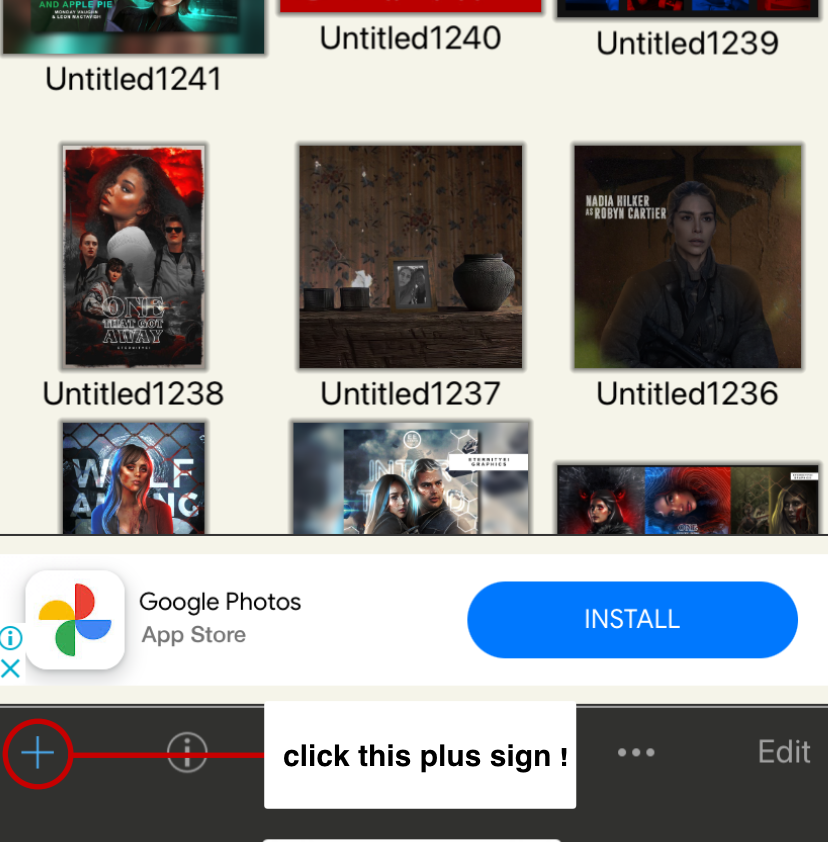
╰┈➤ to get started, you first need your canvas!
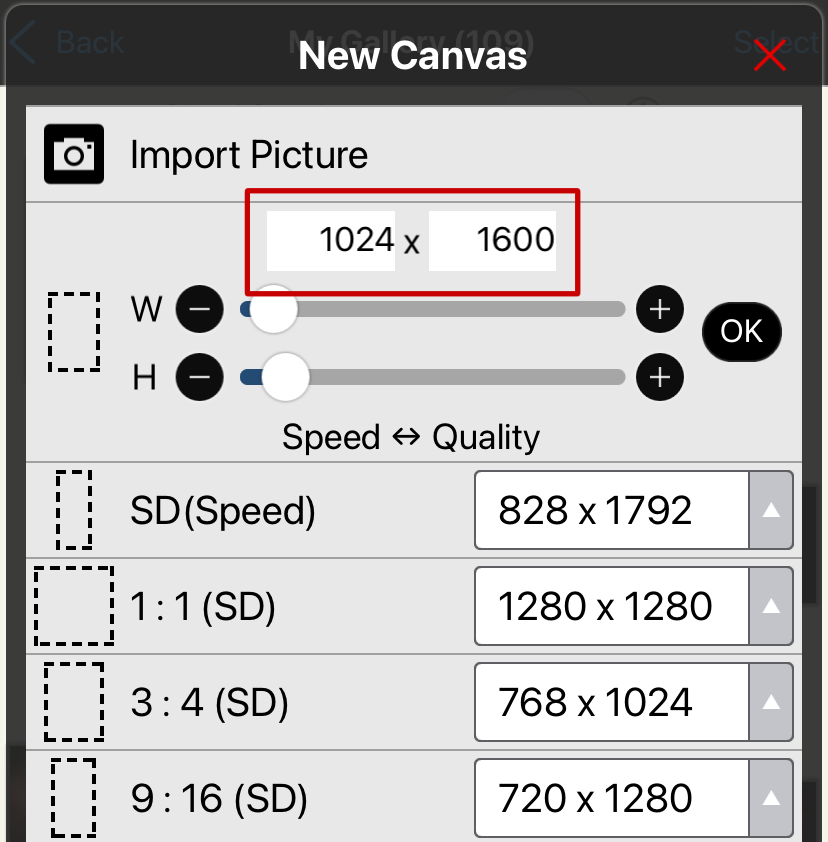
i have a very strict set of dimensions i use:
covers; 1024 x 1600
banners; 750 x 375
soundtrack; 611 x 611
when you click the + you will be introduced to a canvas menu. you can put your desired dimensions in the area i have placed a red rectangle ( image 2 )
click ok! and now, you're ready to move on to the next step!
𝑮𝑬𝑻𝑻𝑰𝑵𝑮 𝑭𝑨𝑴𝑰𝑳𝑰𝑨𝑹 𝑾𝑰𝑻𝑯
𝑻𝑯𝑬 𝑩𝑶𝑻𝑻𝑶𝑴 𝑶𝑭 𝑻𝑯𝑬 𝑺𝑪𝑹𝑬𝑬𝑵
⸝⸝ ʚ 🪓 ! ⌗ °• ━━━━━━━━━
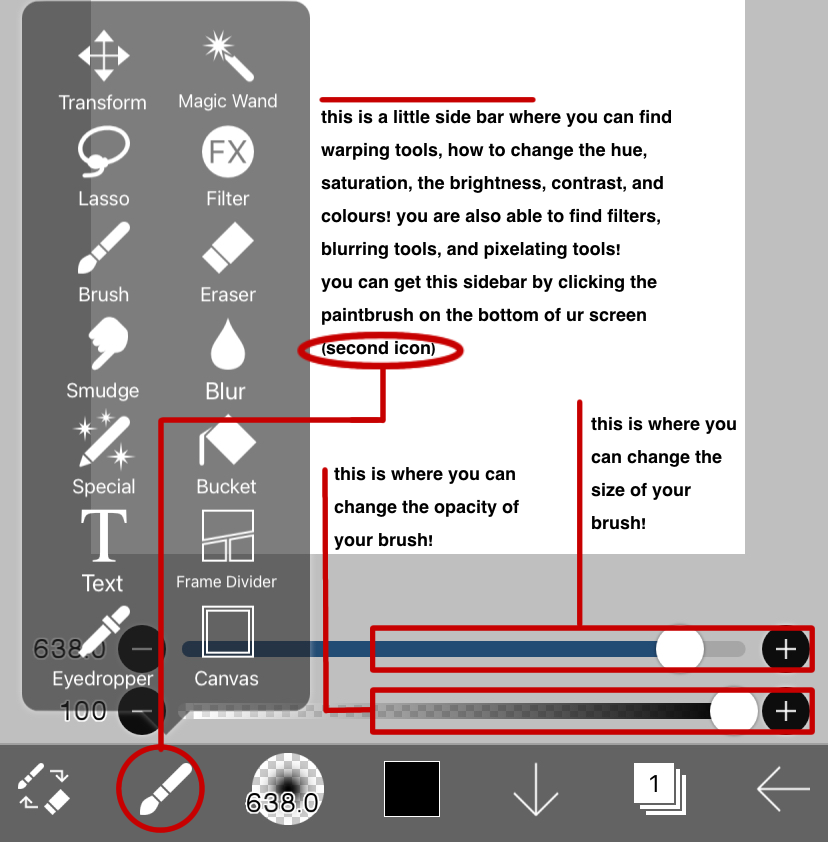
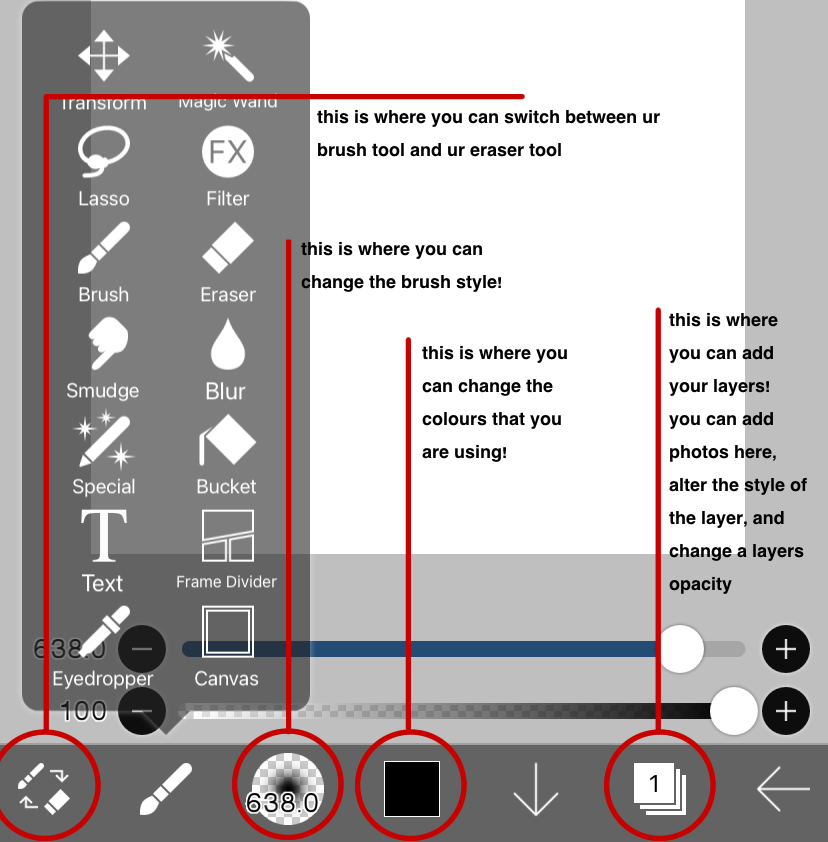
╰┈➤ this is where all of your main functions are. your brushes, your erasers, your colours, your layers. you will find everything here. reading the annotations i've places will help guide you. remember, before going any further in the tutorials, somewhat familiarise yourself with these functions. don't be shy to play around! have some creative fun.
𝑮𝑬𝑻𝑻𝑰𝑵𝑮 𝑭𝑨𝑴𝑰𝑳𝑰𝑨𝑹 𝑾𝑰𝑻𝑯
𝑻𝑯𝑬 𝑻𝑶𝑷 𝑶𝑭 𝑻𝑯𝑬 𝑺𝑪𝑹𝑬𝑬𝑵
⸝⸝ ʚ 🪓 ! ⌗ °• ━━━━━━━━━
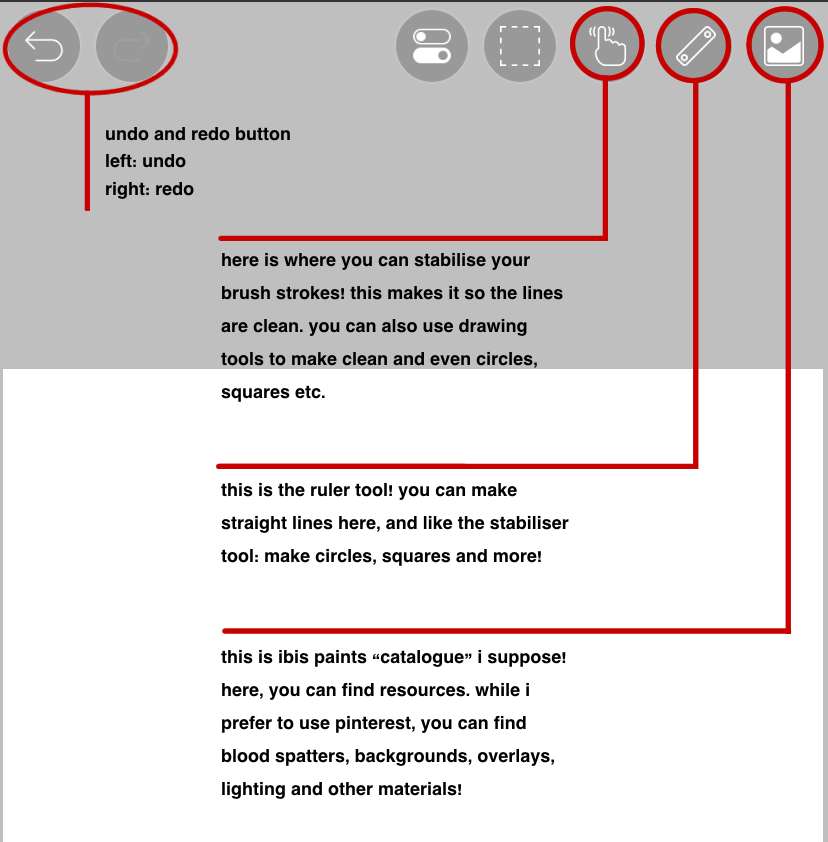
╰┈➤ although i do not use this top part of the screen as much as i use the bottom, i don't want you feeling overwhelmed with your screen. the only functions i really use are the stabiliser and undo/redo! but, for your sake, i have put annotations so that you know what certain buttons do! the first 2 buttons on the right hand side are ones that i NEVER use. you do not have to worry about these!
𝑩𝑹𝑼𝑺𝑯 𝑴𝑬𝑵𝑼
⸝⸝ ʚ 🪓 ! ⌗ °• ━━━━━━━━━
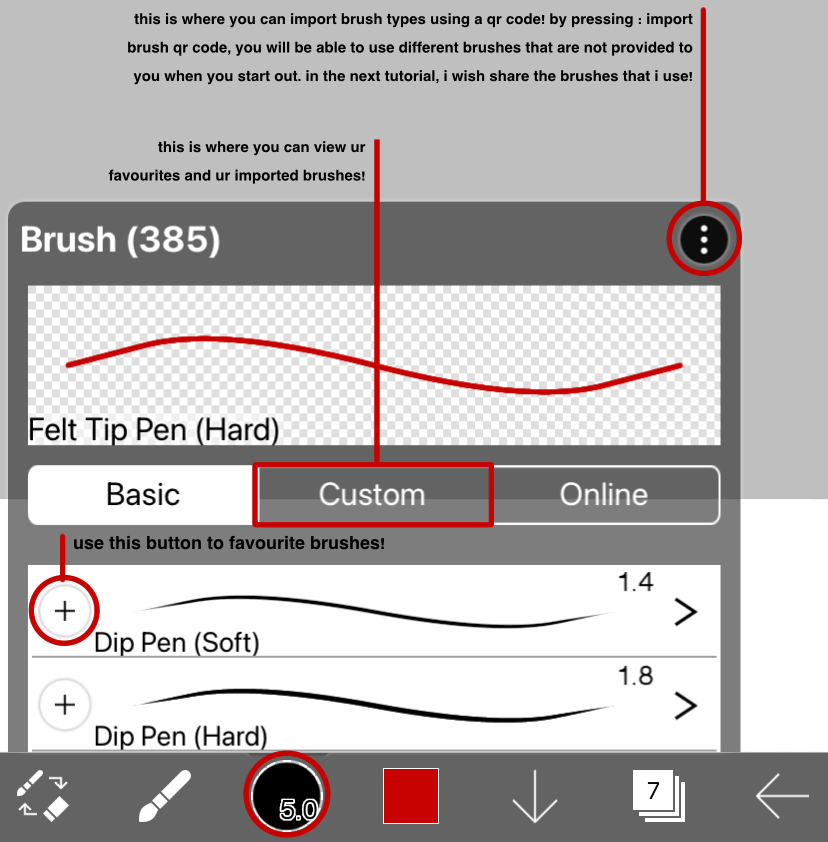
╰┈➤ this brush menu will soon become your bestfriend. i'm not kidding. by clicking the third icon, you will have access to this menu. here, you can see the brushes provided to you by ibis paint x! some brushes are locked, but, ibis paint is very aware of people using their app for free. there will be an orange button next to the brushes, you can watch a 30 second ad and boom, you now have access to every single brush!
in the next tutorial, i will share all of the brushes i use! brushes for hair, brushes for highlighting, and more!
𝑳𝑨𝒀𝑬𝑹𝑺
⸝⸝ ʚ 🪓 ! ⌗ °• ━━━━━━━━━
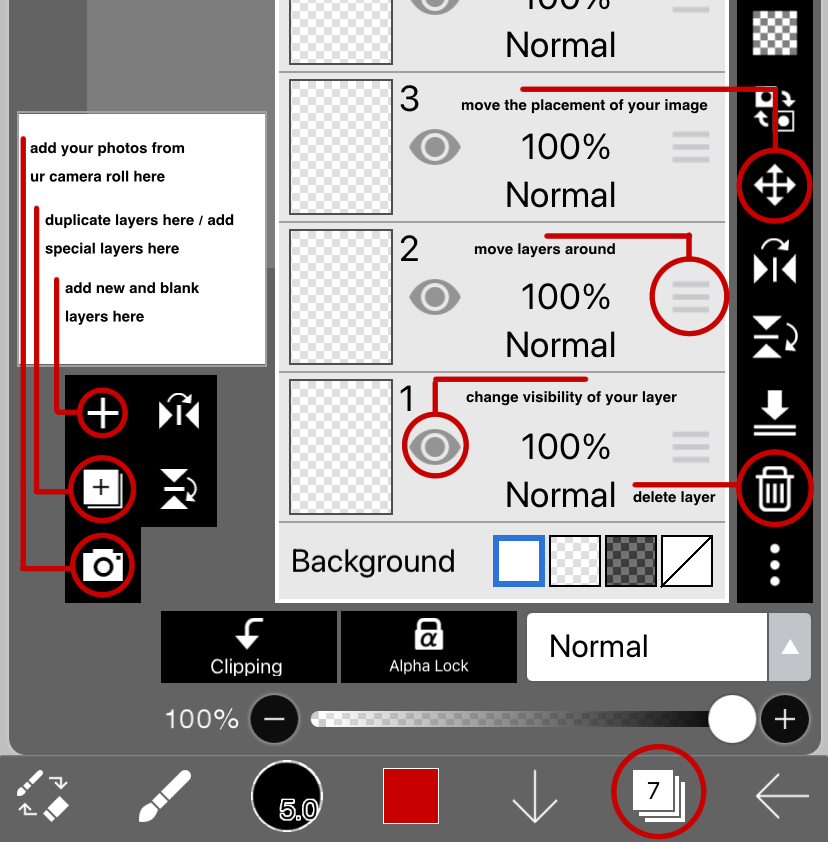
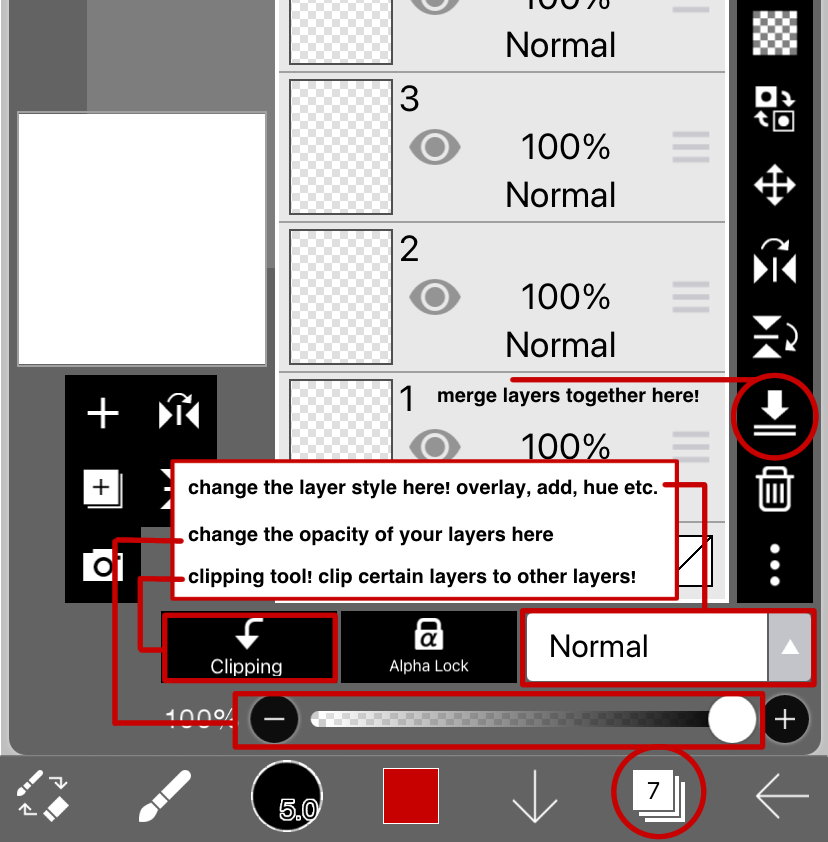
╰┈➤ THE MOST IMPORTANT THING! LAYERS LAYERS LAYERS!! the biggest thing in the tutorials will be the adding of layers. the above annotations will help guide you and make you familiar of the function of almost all the buttons. once again, i've only labelled the buttons that i use. play around with these buttons! it will help you to be familiar.
𝑬𝒀𝑬𝑫𝑹𝑶𝑷𝑷𝑰𝑵𝑮
⸝⸝ ʚ 🪓 ! ⌗ °• ━━━━━━━━━
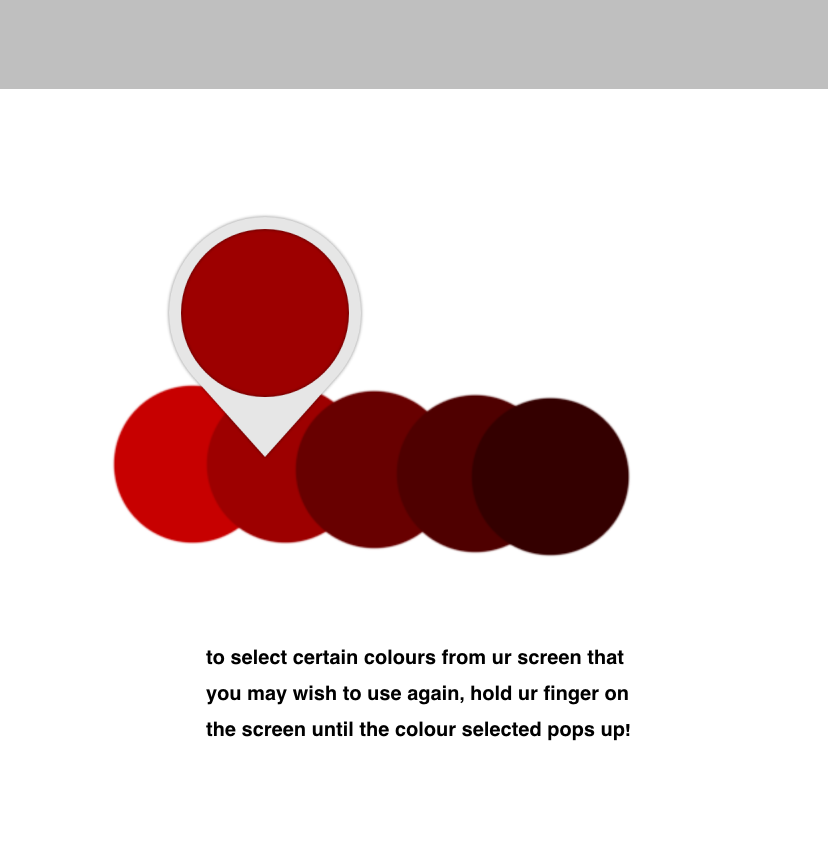
╰┈➤ while i don't use this a lot, i do use it when i'm adding a glow around my face claim and want to use pre existing colours from the background im using. so, this does come in handy! this little short cut saves you from having to go to the side bar menu, and click the eye dropper tool.
𝑺𝑻𝑨𝑩𝑰𝑳𝑰𝑺𝑬𝑹
⸝⸝ ʚ 🪓 ! ⌗ °• ━━━━━━━━━
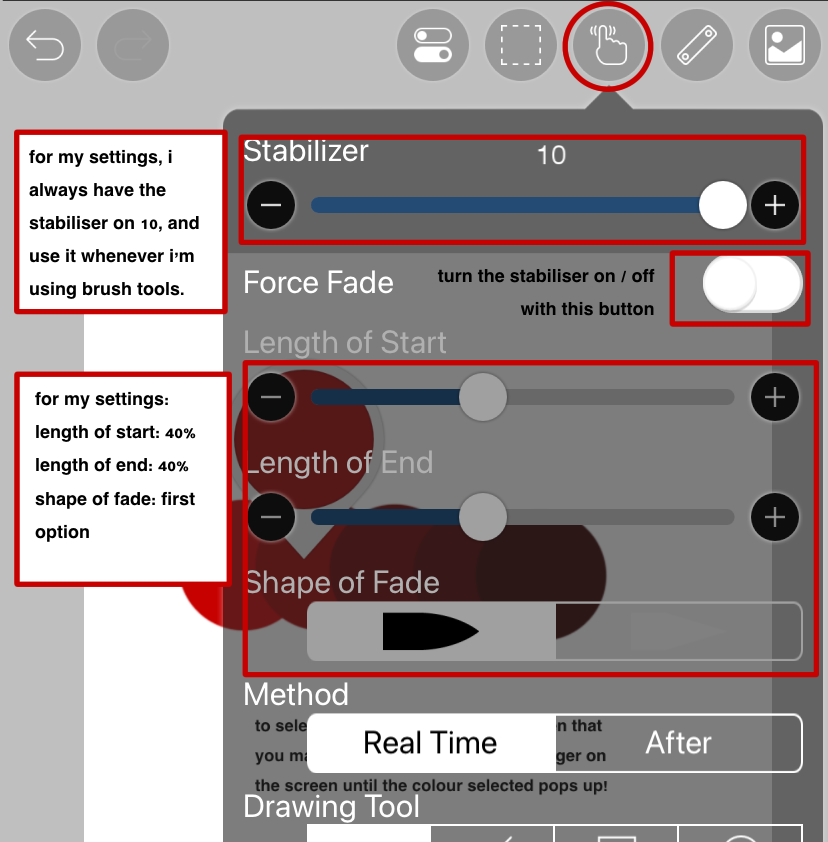
╰┈➤ while not a major tool, it does help my lines be a lot cleaner! i ALWAYS have the stabiliser on! the labels above will explain my settings.
𝑮𝑬𝑻𝑻𝑰𝑵𝑮 𝑭𝑨𝑴𝑰𝑳𝑰𝑨𝑹 𝑾𝑰𝑻𝑯
𝑻𝑯𝑬 𝑻𝑬𝑿𝑻 𝑭𝑼𝑵𝑪𝑻𝑰𝑶𝑵𝑺
⸝⸝ ʚ 🪓 ! ⌗ °• ━━━━━━━━━
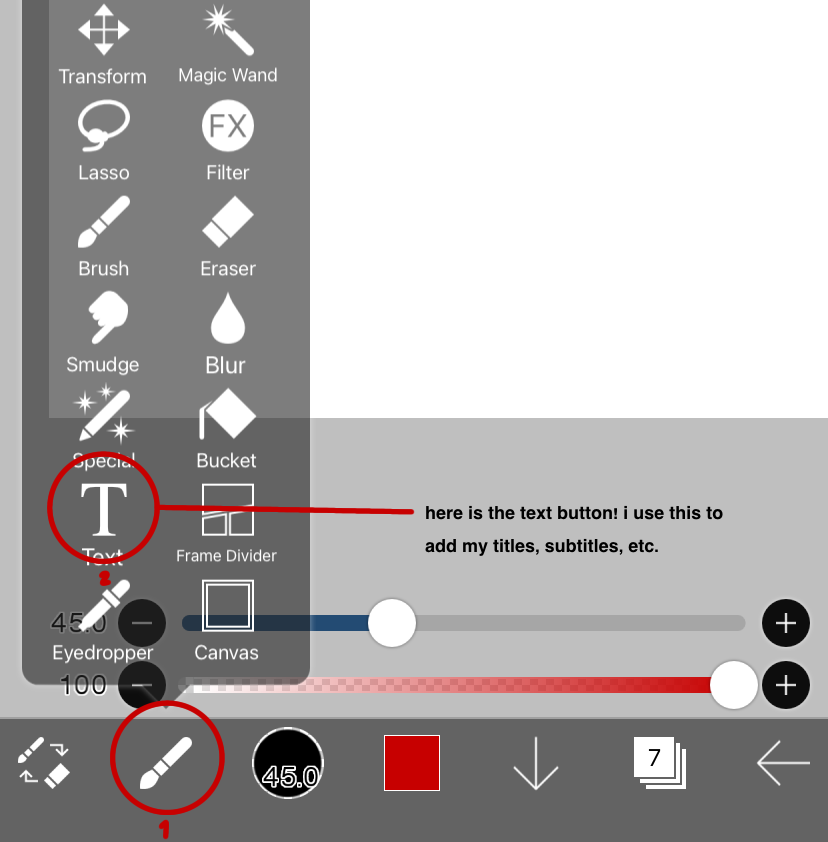
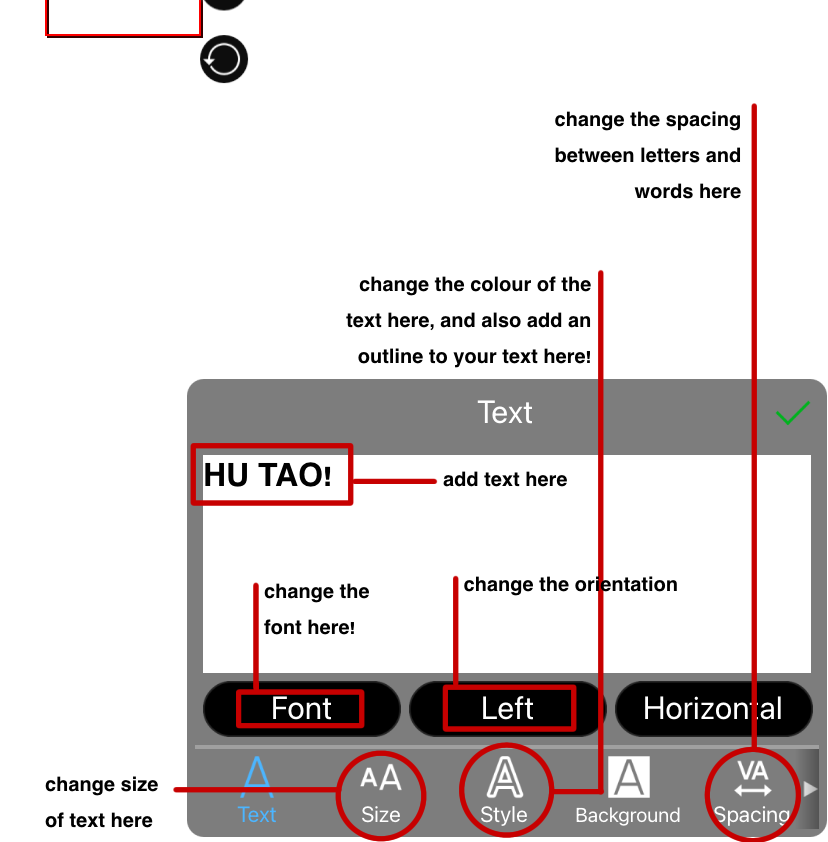
╰┈➤ time to get familiar with adding text! click the second icon > click the text option. now, you can add text wherever you want on the screen by tapping it. you will then be introduced to the text menu. type whatever you want, play around with the text functions! the annotations above will help guide you!
𝑨𝑫𝑫𝑰𝑵𝑮 𝑭𝑶𝑵𝑻𝑺
⸝⸝ ʚ 🪓 ! ⌗ °• ━━━━━━━━━
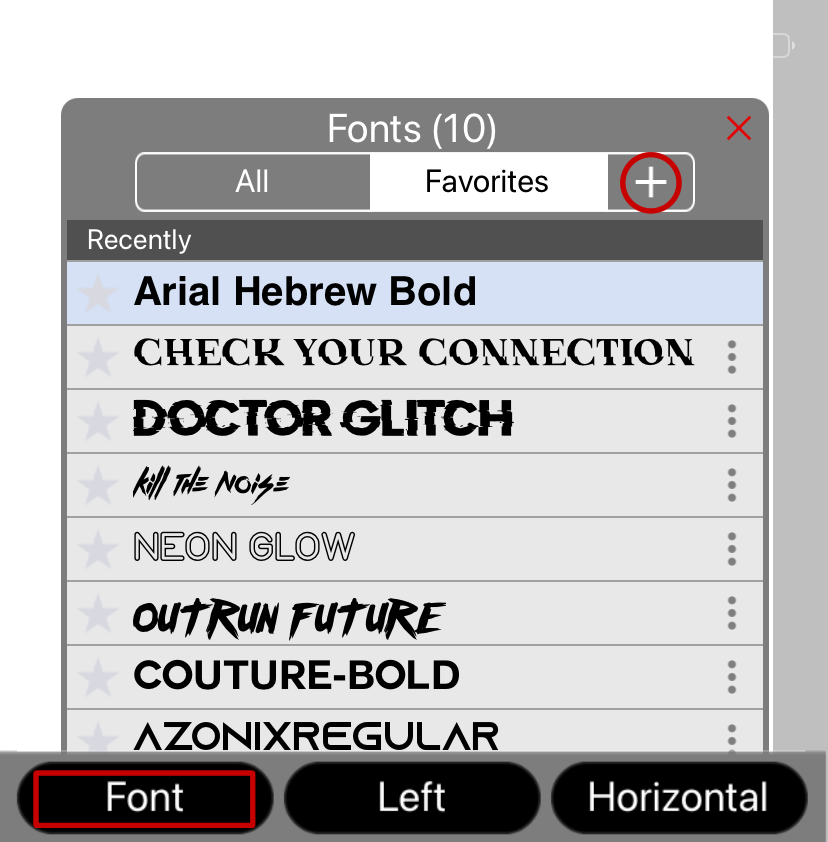
╰┈➤ it's important to have a variety of fonts! here is how to download them. when you open the text menu, click "font". it will open the font menu! click the + that is circled. from there, you can download fonts from places such as "dafont"
𝒕𝒉𝒂𝒕'𝒔 𝒂𝒍𝒍 𝒇𝒐𝒓 𝒏𝒐𝒘!
if you have any suggestions for tutorials, please leave them in the suggestion section on the introductory "tutorials" chapter above this

Bạn đang đọc truyện trên: AzTruyen.Top