𝐬𝐢𝐱. graphic design is my passion


and prison
A STEP BY STEP GUIDE TO HOW I MAKE MY COVERS
ੈ✩˚⊹ you know, it's funny how things come full circle. i've been knee-deep in fandom culture since i was eleven, which, if you do the math, is a terrifyingly long time ago.
picture it: a preteen, wide-eyed and full of misguided confidence, armed with nothing but an iphone 5s and a fierce determination to make the best edits on the internet.
back then, i was all about using superimpose, phonto, and ps touch. oh, those were the days.
i was cranking out walking dead and teen wolf edits like they were going out of style. and let me tell you, they were good.
or at least, i thought they were. i might be looking back with rose-tinted glasses — because for the life of me, i cannot remember my old instagram username. it's like it vanished into the ether of forgotten handles and embarrassing phases. but i digress.
now, if there's one thing i've learned over the years, it's that the internet never forgets — except, apparently, when it comes to my instagram username. i mean, i had a huge cult following back in the day.
i'm talking big-time, y'all. the kind of following where my notifications were like a slot machine that just kept spitting out coins. i had people waiting on my next teen wolf edit like it was the next episode.
it's torture, really. because if i could just get back into that account, i could show you guys what exactly i was producing. you'd see what all the fuss was about.
i distinctly remember this one time — one of the biggest editing accounts out there followed me. it was like being knighted by the queen herself.
and holland roden, yes, holland roden, actually commented on one of my edits. i nearly fainted. no joke. i was one step away from needing a paper bag to breathe into. and because i was a perfectly rational human being, i did what any sane person would do — i added it to my bio. "holland roden interacted x3 times." i mean, why stop at once, right? i was basically besties with her at that point.
it's funny, though — how something that was such a big deal to me back then now feels like this elusive memory, just out of reach. but even if i never remember that username, those experiences are etched into my brain. the thrill of creating something that people loved, the rush of seeing those notifications blow up, the absolute triumph of getting that comment from holland roden. those moments? they're mine forever. and honestly, that's probably better than any username could ever be.
but if the gods are listening — i wouldn't mind a little miracle. just saying.
but i'm pretty sure i blocked it from my memory for a reason.
a few years into my graphic design journey, i finally decided to upgrade to photoshop. it was like stepping into a whole new world. suddenly, i had all these tools and possibilities at my fingertips, and i haven't looked back since.
my style? well, it didn't just appear out of nowhere. it was a lot of trial and error, a lot of late-night sessions where i was one more failed attempt away from throwing my laptop out the window. but eventually, i found my groove.
nowadays, when i create my covers, it's almost like muscle memory. the wit, the spark, the slight flair of drama — it's all there. the process is messy, but in the best way. i throw things together, take them apart, and maybe have a small existential crisis in the middle of it all. and then, somehow, it just... clicks. it's like magic. or maybe just the result of years of practice, perseverance, and a little bit of stubbornness.
so you've been asking, and i've been dodging — my bad. but today, i'm finally going to show you how i make my covers in my current style.
no more secrets, no more gatekeeping.
dedicated to -slutantics for asking how i make them <3
here's my step-by-step guide to how i make my covers.

❨ for the purpose of this ch. i'll just be recreating this current book cover, mostly because it's the easiest and less time consuming, and its exactly how i make all my covers. only difference is i add more boxes, etc. ❩
𝐎𝐍𝐄 ⩩ finding your pictures
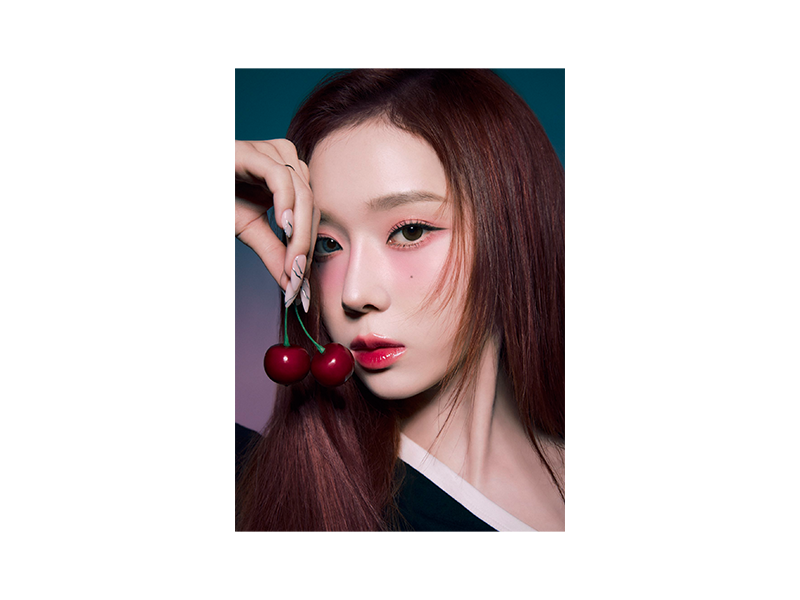
this shouldn't be a difficult step unless you have a main character that has little to no pictures, then, yes, this will be hard. but i usually find my pictures on google, pinterest, or twitter.
𝐓𝐖𝐎 ⩩ cover dimensions
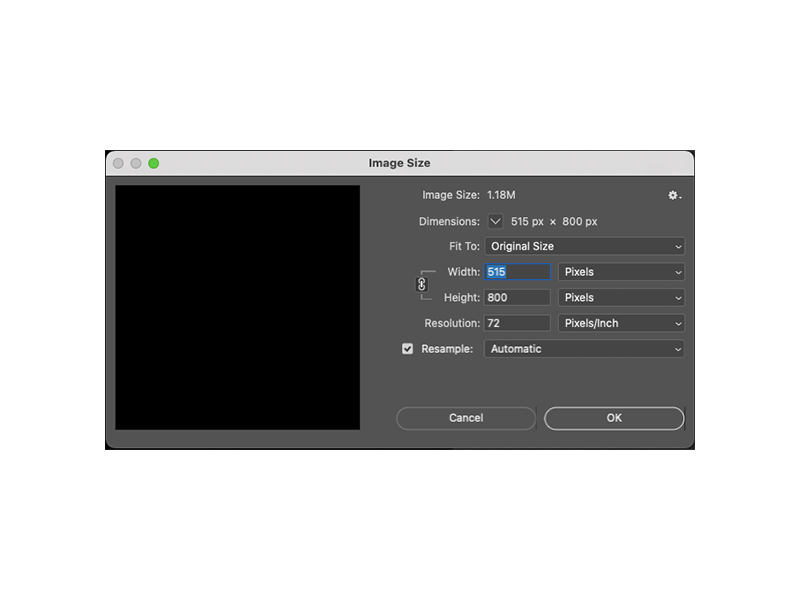
because of wattpad's rules, you have to make your cover these exact dimensions, maybe a tiny bit bigger but these don't require much mbs.
DIMENSIONS — 515 W x 800 H PIXELS
RESOLUTION — 72 PIXELS/INCH
𝐓𝐇𝐑𝐄𝐄 ⩩ layout
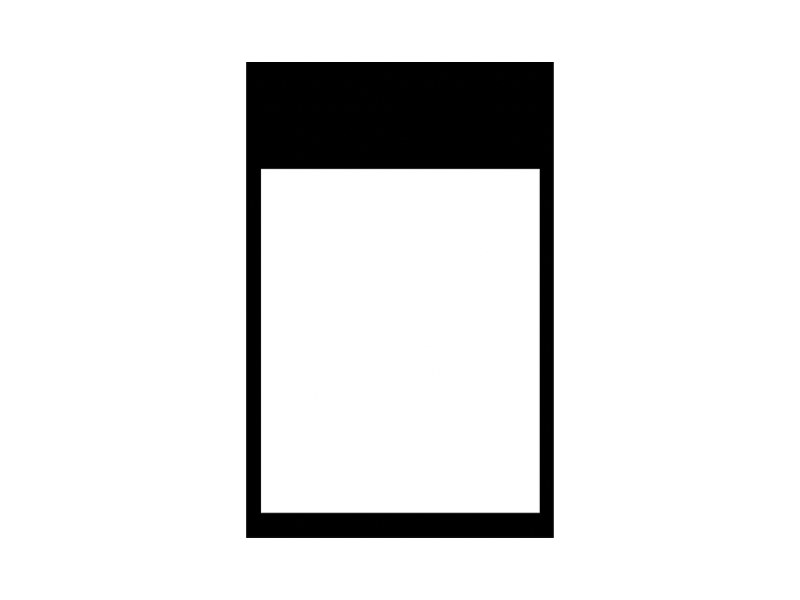
another easy part, a plain black background, a white box in the center. note: the white box is where we are going to put our main image.
note ! you can by all means use this pic, however, it will be difficult to use a clipping mask for the white box later on. i would suggest instead, if you use photoshop, to download or take a screenshot of the picture, size it to your canvas, and use your rectangle tool to create a new white box.
𝐅𝐎𝐔𝐑 ⩩ image effect
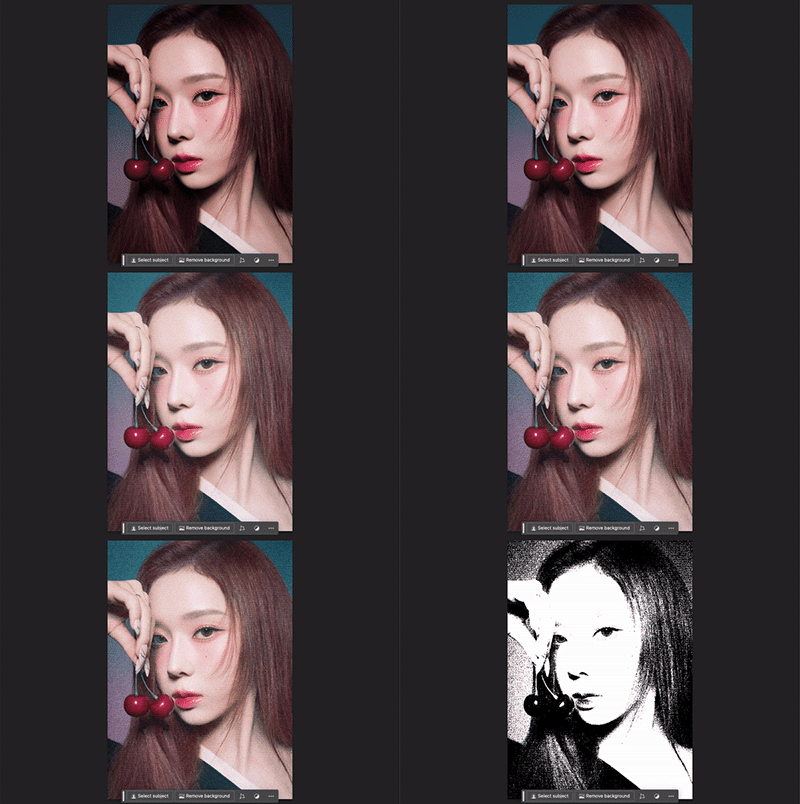
probably the most important step, because i think this is the part that most of you are curious about, the grunge look effect.
on a separate window, open your picture
on your image layer, add noise 10% ❨ filter > noise > add noise ❩
LAYER ONE — levels
LAYER TWO AND THREE — extra noise ❨ add literally as much noise as you like ❩
LAYER FOUR — threshold
note ! on layers one and four, levels and threshold vary depending on your picture. mess around with the arrows and see what you like best.
𝐅𝐈𝐕𝐄 ⩩ dodge and burn tool
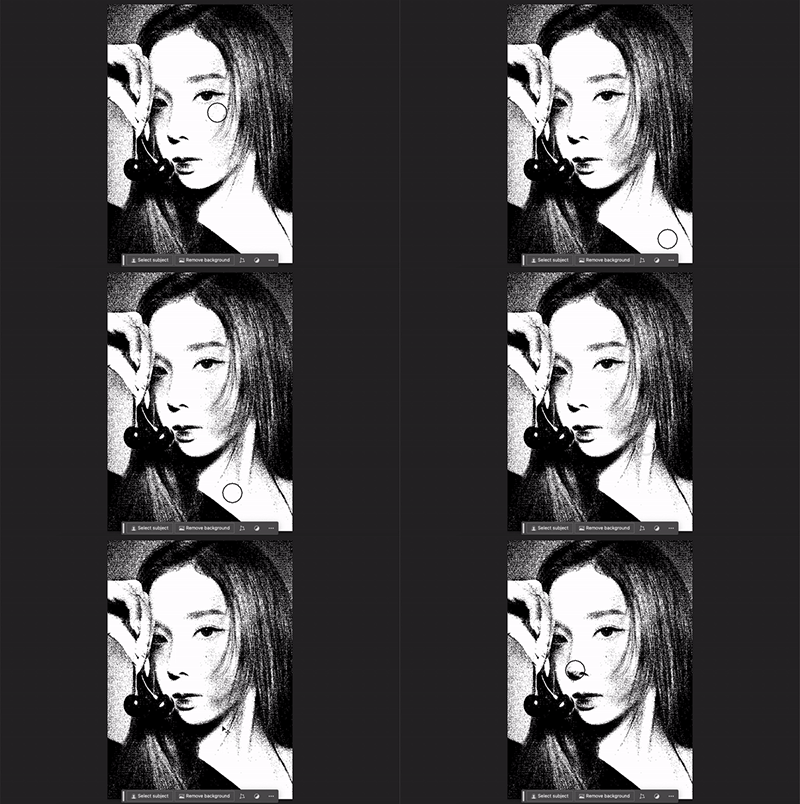
self-explanatory, use the dodge and burn tool to enhance or unenhance your photo.
note ! make sure you are using this tool on your main photo
𝐒𝐈𝐗 ⩩ merge > clipping mask
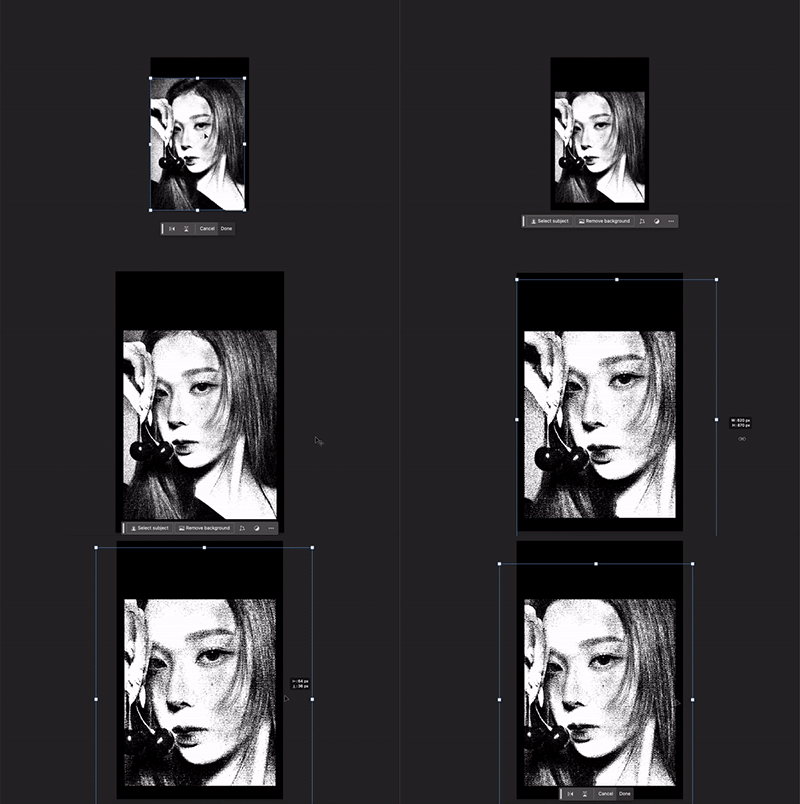
merge all the layers using COMMAND > E that way you can drag the layer to your cover layer without problems.
resize the image depending on your white box, then, create your clipping mask using ALT > COMMAND > G
you can then resize your image again if needed as it's now in the white box.
𝐒𝐄𝐕𝐄𝐍 ⩩ add text and gradient overlay
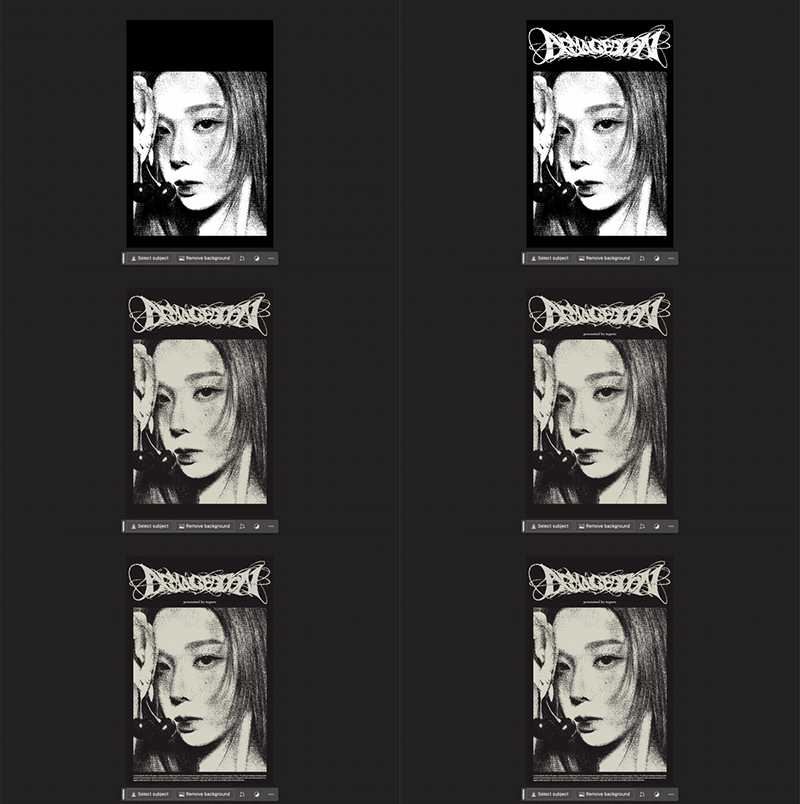
another self-explanatory one, add your title and any extra text like your username, synopsis at the bottom, etc.
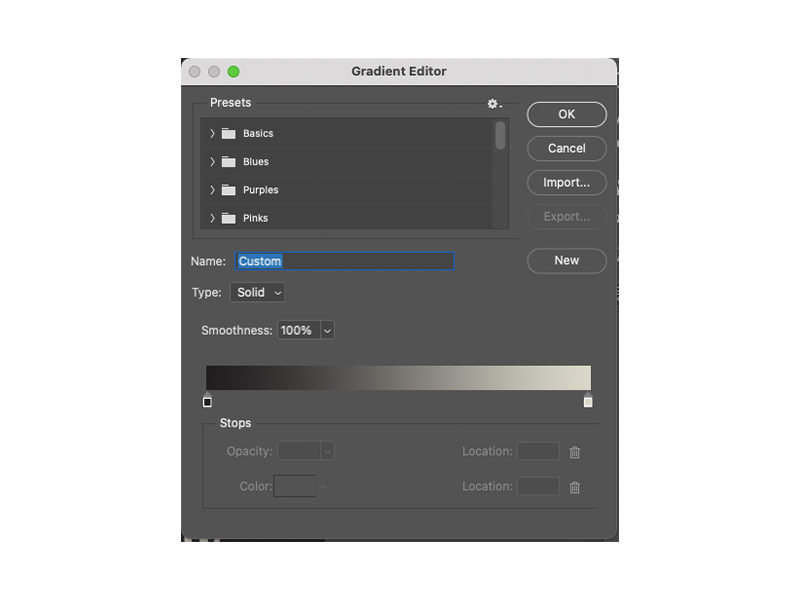
i am gatekeeping my color hex code but literally you can probably just screenshot the image of my gradient editor window and use a color picker i mean it is right there LOL
𝐄𝐈𝐆𝐇𝐓 ⩩ merge > filter gallery
MERGE ALL YOUR LAYERS ! i would recommend grouping everything together, copying that group layer then merging the copy so that you keep your original layers in case you find something you want to change later.
once you have your layer merged go to filter > filter gallery
note ! is your filter gallery greyed out? your document is either in CMYK, or it's in RGB, in 16 or 32 bit. the filter gallery is disabled in these modes. put your document in RGB 8 bit to enable it. this is crucial if you want the grainy effect.
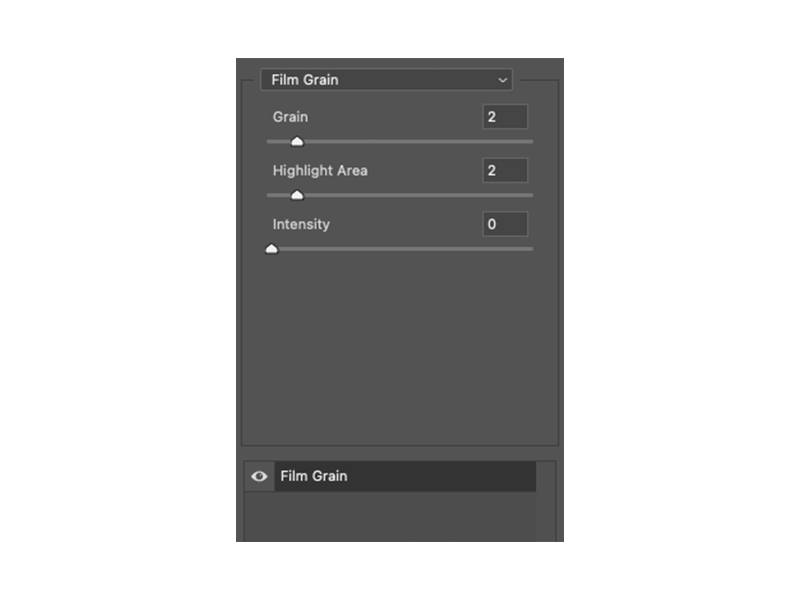
once your in the filter gallery scroll and find film grain and use these settings;
GRAIN 2
HIGHLIGHT 2
INTENSITY 0
note ! i often change intensity to 2, just a matter of preference
FINAL RESULT !
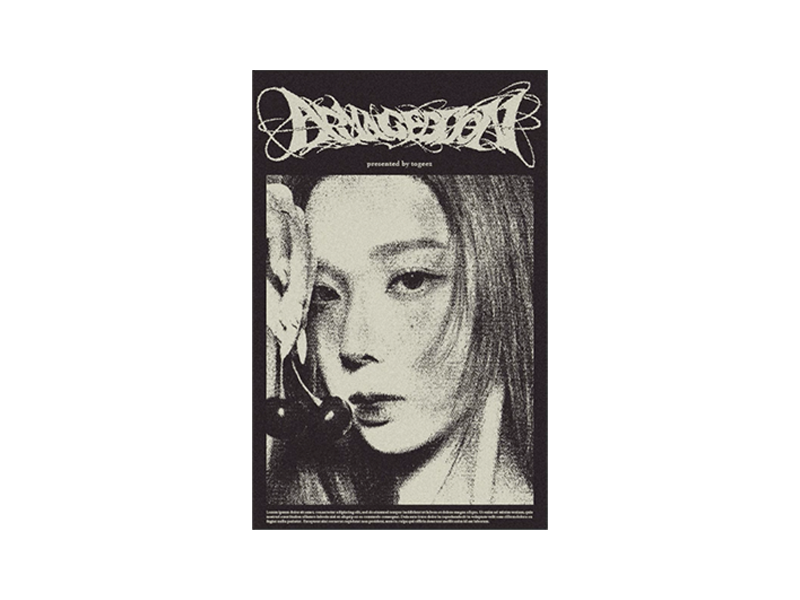
that's literally it yall, I've made it as simple as possible, if anyone has any questions do let me know in this chapter since wattpad deleted the private messaging feature
(*꒦ິㅿ꒦ີ)
much love,

Bạn đang đọc truyện trên: AzTruyen.Top