e-book template: Part 2
HOW TO FORMAT A MICROSOFT WORD DOCUMENT AS A TEMPLATE SO IT IS ALREADY FORMATTED FOR UPLOAD TO AMAZON AS AN E-BOOK ONCE YOUR STORY IS COMPLETE AND EDITED
Note: I have formatted e-books and print books for both myself and for clients as a formatter for over 10 years. Now retired from providing the service, I wish to share with others the ins and outs of formatting that I have learned over those years.
LET'S BEGIN
1 Open a new blank document and give it the title of - My e-book template - then save
2. Now we are going to set up some styles.
Create your title page as follows by typing.
Title
Author
Publisher and logo.
Then place you cursor here after the word logo and with the return key, add another space.
Now go to the tabs at the top of Word and choose "Layout" on the Home page.

When Layout is clicked, go to where it says Breaks. You will now see different types of Page Breaks in a drop down box. Click on the first one "Mark a point at which one page ends and the next page begins." Then once this is inserted, go back to where you have typed Title and click you cursor on the page.

No we are going to set the Styles for the document. For eBook it is best to set the document with Times New Roman size 12 for the body text for upload. This is standard. Amazon will convert the font to their own designed font for devices anyway. Readers will then have the option on their devices to change it to their desired font and size. In any event, font sizes cannot exceed point size 16, or Amazon will ignore it, together with any nonstandard font which they will modify to a standard font.
Go back to the Home tag at the top of the page to see the styles as below and to set them going forward, starting with Normal.

Place your cursor over where it says Normal and right click to reveal a drop down box and select "Modify."
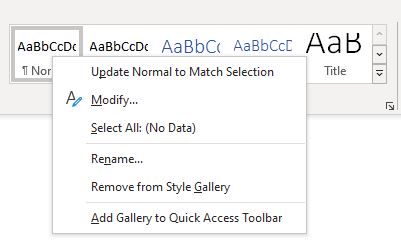
Click left click on Modify to reveal the style settings drop down box.

Set everything as in the image. Times New Roman. - 12 -automatic, etc, then click the Format box at the bottom left of the box. This will reveal the paragraph settings drop down box. Select Paragraphs and the box below will appear.
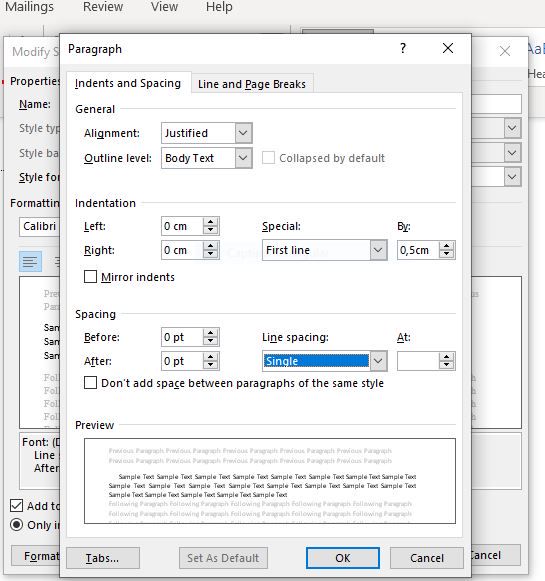
Follow the settings as they are in the box above. If you use inches, then calculate the indent from the cm setting. I use cm. Once complete click OK and it will be set and the box will disappear, then click OK on the remaining box and that will disappear and your Normal style is set.
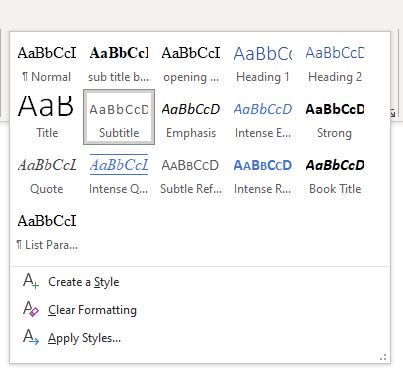
For the opening paragraph without an indent we have to set up another style and this one will trick normal style to show no indent. Without this setting, Amazon will auto add an half inch margin even if you alter the first line setting to zero. First click on the Normal style to highlight it. Then at the end of the style box below you can see three direction arrows. click on the bottom one to open a box to reveal all the styles as further down below.
Click on Create a Style shown below. A box will appear with a style name of say Style 1. Alter this to say No indent, or say Opening para. Click okay and it will add it to the styles with the same setting you had for the normal setting. Go through the same procedure you went through to the box for paragraph settings and adjust the first line indent to 0.01. This will trick the conversion software to show as no indent. Then press OK to set it.
You can do the same for any style that you have a requirement for such as a subtitle. You can alter the settings to bold, maybe point 14 font size, you can center it instead of justify, but if you want it to the left without an indent set it a 0.01 1st line indent.
One style you will need to create is a centered style for the at least the title page. Set the style as Centered as opposed to a Justified style. Here there s no need to set the indent at 0.01, you set it at no indent. You can start off by having the font as Times New Roman - bolded - size point 16. Once that is done, go to what you have typed on the title page. Hold down the mouse and run it over all the text to highlight. Click on the style to center the text, then save your document.
For the chapter headings (Chapter 1) and so on you need to use Heading 1 which all Word docs have. Again modify this to Times New Roman. You can make it bold to a maximum of point size 16. you can center it or have it to the left with no margin by altering the first line indent to 0.01
The reason for using the Heading 1 is that you will use this to auto create the table of contents.
Once you have all the required styles, you are ready to produce the template.
You already have the title page, though later I'll explain how to set and design the page. First you need the front matter. Go beyond where you added the page break to which has added a new page. You can choose the order and add others or take way from the list of what you want in the front matter, but you must have a table of contents page as obligatory, and of course you need copyright page. optional would be say an author note page, or say acknowledgements.
To start with simply type copyright. Click and hold down to highlight the word copyright, then click on Heading 1 in styles. Then add 4 paragraph and add another page break. Following that type table of contents, add another 4 para spaces, (don't give this a Heading1 style. )I'll explain later). Then add another page break. You can either continue the same with say author note, or acknowledgements if you so wish, remembering to highlight them and applying Heading 1, separating them with 4 para spaces then a page break. Now move onto the first chapter or prologue. If you have a prologue, then type in that, highlight and apply Heading 1, then add 4 para space, then a page break. Then move onto chapter 1 doing exactly the same by highlighting it and applying Heading 1 until you have the required number of chapters you imagine you have planned. I do this for 60 chapter all with 4 para spaces between them. You can add or delete chapters in you actual e-book as it will not be possible to estimate correctly how many chapter your book will have. I only do it for 60 chapters because I target 1500 per chapter for 60 chapters to produce a 90,000 word story. Your estimates might be different.
Note: the reason for adding 4 paragraph spaces between the chapter numbers and the page break is purely for navigation purposes when scrolling. You can backspace these to delete them once the text is added to the finished chapter.
Once that is done, you'll deserve a break. What you do once all the chapters are done, is scroll to where you typed table of contents and click under where you typed the heading and click your cursor there. then select the References tab at the top.
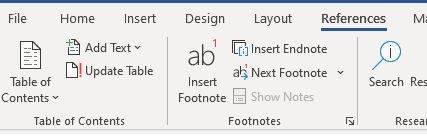
Open the table of contents box at the arrow and click to select Table 1.
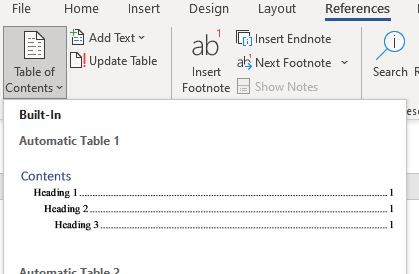
This will now add a table of contents of the front matter and all the chapters, but it will need modifying to remove the page numbers. You will also need to delete the wording you typed for the table of contents.
Here is how we get rid of the page numbers. First highlight the Table of Contents. You will see where there is a dark blue band above the word contents below. If you click to the very left of that blue band it will highlight the contents. Once you1ve done that, right click on the mouse in the body of the highlight to revel the large drop down box below. Scroll down and sect TOC.
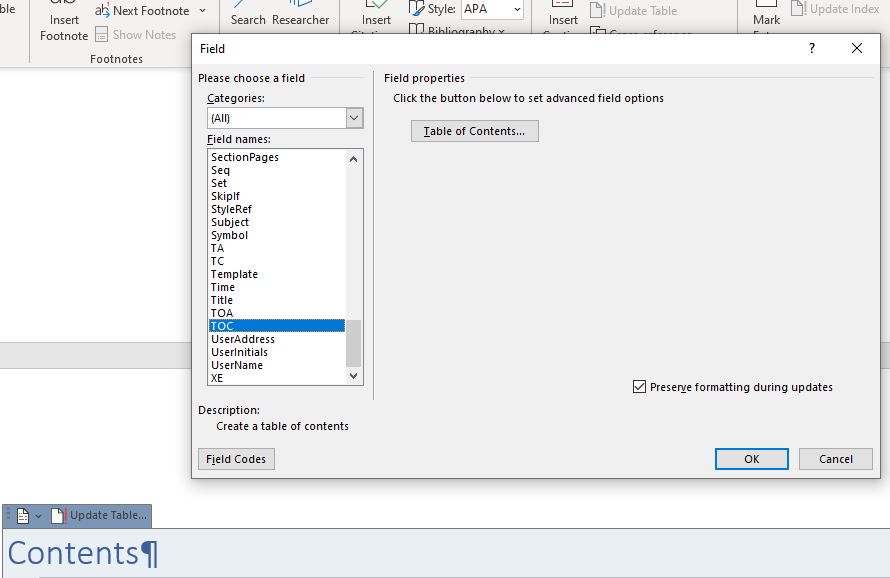
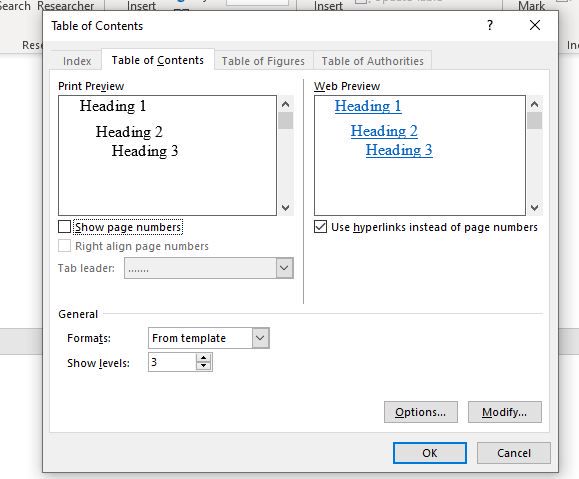
in the same box above. click on where it says Table of Contents under field properties to reveal the box below. Show page numbers and Right align page numbers will be checked - uncheck them and click OK. Your TOC will now be set with one last step.
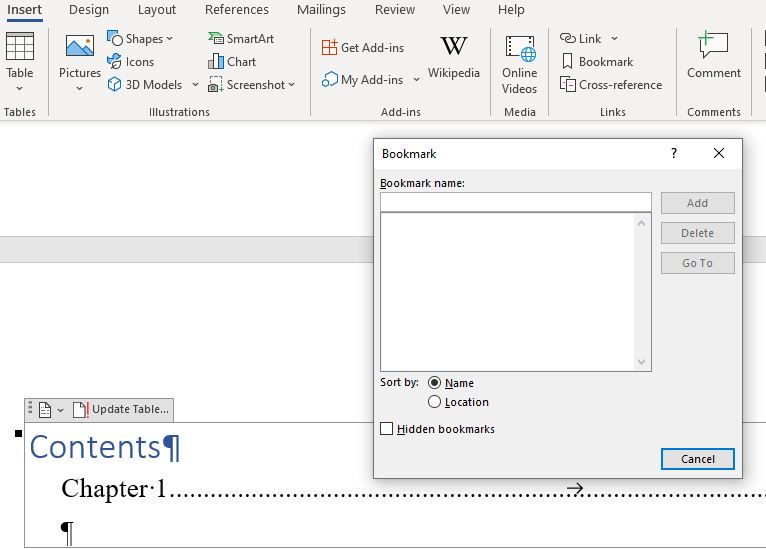
To complete you TOC formatting, go to the contents page in your doc and highlight where it says CONTENTS. Now go to the top of the document and press the Insert tab shown below. Click on bookmark to open a new box. Click below where it says Bookmark name and type - toc - then press add. The reason for this is though the toc will work manually in the Word doc, when it is uploaded it will not work on the device to navigate the chapters without this last step.
Make sure that you have deleted the original table of contents that you typed and backspaced out any paragraph spaces the you added to the Table of Contents Page.
This is now the basics of setting up your e-book template finished. You can now start writing your book.
The next chapter will show how it is built from the title page onward. It might seem like a lot of work, but once it's done, it's done and you will have the basics of a template to end up with a professional e-book file.
If you have any questions, then ask in the comments section.
Bạn đang đọc truyện trên: AzTruyen.Top