Building your e-book: Part 3
You have your template prepared, but first there are a few things to add to your template that will always remain the same.
Before doing anything else, there is something you should know. This question has cropped up many times over the years - "Why cant I use a special font I've downloaded for my title, or mix different fonts in the body text?"
The answer is simple. For Amazon's software to convert whatever type of document that you upload to a .mobi file for viewing on a device, the font used must match what fonts they have chosen as standard as part of the conversion process. Further, unlike a print book where the fonts are fixed on the page, the reader gets to choose the font they wish to read the story with on their device, therefore the fonts need to be the same throughout. Hence, use a fancy or nonstandard font, and the conversion software will ignore it, and replace it with a standard font.
All is not lost though as you can use an inserted image on the title page that includes a special font. However you must be aware that readers can view e-books with a black background and white text, therefore any image will show as a white box surrounding the title. Not a big deal though as not many view e-books in this mode.
Time to start adding to your template, so open the doc.
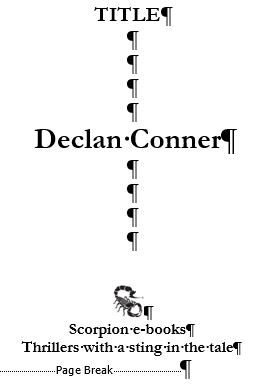
Go to the title page on your template and all you will have is this. The title will vary from book to book, but not the author name, logo and any logline. Center all as below.
TITLE
AUTHOR
Logo and tag line
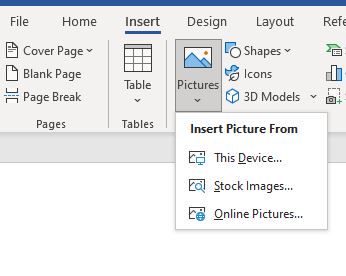
You can space this out further by hitting the return key to a maximum of 4 para spaces. Any more the 4 and at conversion it will ignore all spaces a show them as single spaced. First type in your author name as this will be constant. If you choose to have a publisher name and logo (recommended), then do as follows. backspace out where you have typed logo and logline. At the top of the document click on the Insert tab. Go to Pictures and click the arrow to reveal the box below, then select This Device. A new box will appear for you to find the image of the logo you wish to insert. Locate your logo icon and click, then click okay and will insert the image. Now save you document so the action isn't lost
Note? Never copy and paste an image into the doc. Only ever use this method to insert an image.
The following shows the tile page with the paragraph returns and the page break after inserting the logo image and adding a log line.
Don't do anything with the table of content page other than double check that all the title heading of you frontmatter are listed, eg COPYRIGHT, ACKNOWLEDGEMENTS, AUTHOR NOTE etc. If not, change the style to Heading 1, then go back to your TOC and click update.
Author notes and acknowledgments are usually variable, but the wording of the copyright is usually standard apart from the title and copyright date, so its best to put it on the template as per the following example. You are free to copy the wording. For the template use xxxxxxxxxxxxx in place of the book title and highlight in red to remind you to add it when you start an actual book title. Substitute the dateof copyright with xxxx also and change the font color to red so you don't forget to add it back in the actual book with the correct year.
To add the copyright symbol, click on the Insert tab at the top of the doc. At the very right hand side of the insert tab, you will see, Symbol. Click on the arrow for a drop down and with your cursor in place on the doc, select the copyright symbol.
Note, the body text in the chapters of your document is single spaced with indents. Fiction is not formatted as block text that you are used to on Wattpad with a space between paragraphs. However, what I have done here is used my no indent style and a single space to mimic box text for the copyright page. This will only work if you have set your style for no indent at 0.01 first line indent, without which, the conversion software would ignore the para spaces and bunch up the text and add an automatic half-inch margin.

Once added, save your document.
Time to start a new book story. With your template now open, go to File at the top left and click. Choose Save as from the drop down. Type in the provisional title you have for your story and then click Save. You now have a copy of the template formatting open, but with the title of your new story. You can now close your template.
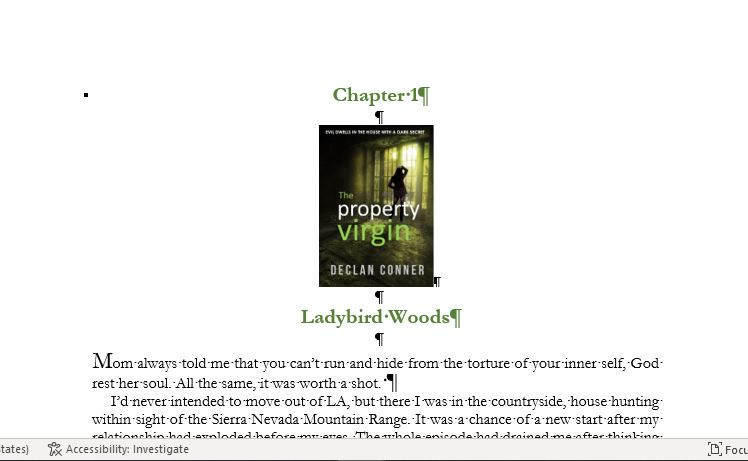
What I have done below is to make A high quality JPG (300dpi) of the title on a white background a it appears on the cover and used the same method that I used to insert the logo. and I've left in the para marks and the page breaks only for reference. They will not show when uploaded and converted, but you can switch them off if you wish. The paragraph marks can be turned on or off my clicking the symbol in the Home page. I find it better to keep them showing as I write.

Using the styles you can now start your book and when finished and edited it will be ready to go. You can set your styles however you wish and me adding the image of the cover thumbnail is purely from my own design consideration. I've added a raised capital letter, but it is purely optional and a personal choice. To create a drop cap style, highlight the first letter, select insert tab. Look for where it says Text and locate the symbol for drop caps over to the right at the top and click on it. Choose the style and click. Hey presto, you have a drop cap.
If it is that you have your manuscript already but not formatted in this way, for example you might have formatted it for pasting into Wattpad chapters as block text, then you can copy and paste individual chapters into the new document. All you have to do them is the highlight the text and press the require style and it will auto reformat. Bear in mind the first sentence of the chapter will have to be highlighted separately and you will use the no indent style.
It is important to note that you must not use the tab key anywhere in your document. If you do, then when converted it will jumble up the text.
Do not add page numbers or headers in your document for upload. Those are reserved for print books with fixed text on the individual pages.
By way of explanation for an e-book not having page numbers or headers that a print book would have, here's how you might visualize how e-books work.
Imagine if you will an unraveled toilet roll, with the separate sheets having serrations as they do, and for these purposes we'll liken those serrations to fixed pages in a book and to the screen size of a reading device, for the front matter, chapters, and any backmatter.
If you then place over that a floating separate image of the text you have set at a font size, then on the face of it, the pages would be fixed. However, there are two factors to consider. One is that not all device screens are the same size to view the text, and secondly the reader can increase the font size that that wish to read for their comfort, or use zoom on say a cellphone. What you see on the screen has to stay within the parameters of the device screen, so as the font size increases there is less text seen on the screen, hence viewed pages are not set and are what we call flowable and not fixed text.
Only place your TOC in the front matter. It is against Amazon's terms and conditions to place it at the back.
As final note, I didn't add any back matter to the template, though you would be advised to do so. It could be standard wording from the author thanking the reader and politely asking for a review. You could add links to your author page, or to specific books. If you have signed up to send newsletter to followers, you could have a link for the reader to sign up and receive notices of future publications. To add a link to any text, highlight the link, go to the Insert tab and then across to the Link symbol. Click on that and follow what it asks for to make the link live.
I hope you have found this of use. Yes its a lot of work to start with to create the template, but once its done, its done for all time as saves you having to do it anyway by repetition every time to produce an e-book. It also provides constancy of formatting design. I'll be adding more chapters, probably the next one will be formatting internal text a print book.
Bạn đang đọc truyện trên: AzTruyen.Top