Fancy Icon || Tutorial.
Hello hello!
Today we will be learning how to make a fancy-schmancy icon. I honestly could have done a better job with the title of this tutorial, but I've got zero idea what those particular type of icons are actually called. Anyway, back to what you are really here for.
Below is how the end product is supposed to look.
════════════════════

════════════════════
App Used: IbisPaintX
Duration: 1 Hour
Tips: Name your layer to not get confused. Select a new layer for every time you begin a new step.
Credits: Creators of the custom brushes.
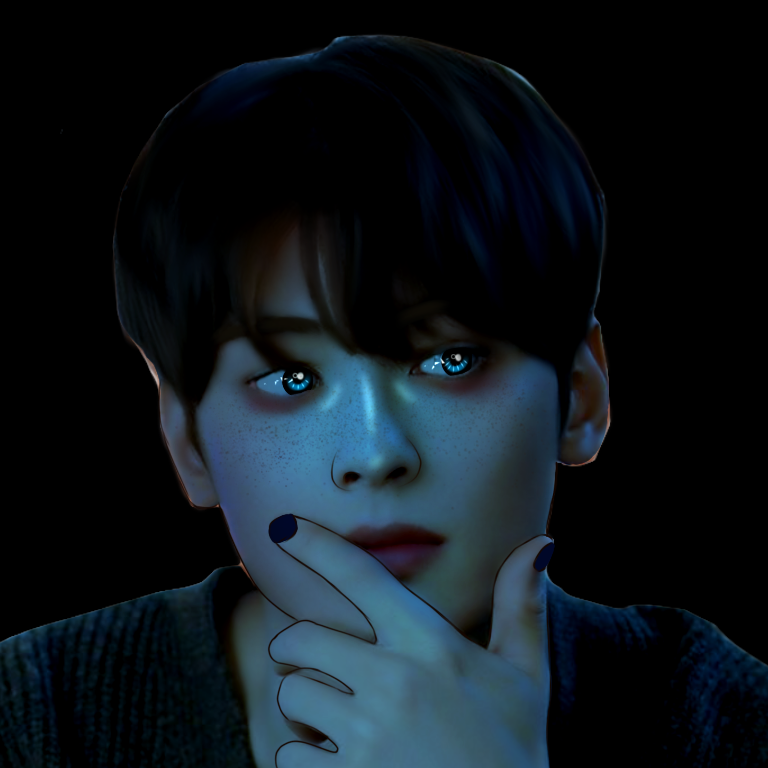
Step1:
Select the model. For better results, it is advised to use a close-up picture. It will make the details pop up.
Step 2:
Set your canvas and paint the background with whatever color you like. Normally, I would go with a darker shade. For this one, I chose black.
Step 3:
Import your image and adjust it according to your preference. Once you're done with that, DO NOT FORGET TO DUPLICATE THE LAYER. Duplicating layers is helpful when you make a mistake and want to go back but not start all over.

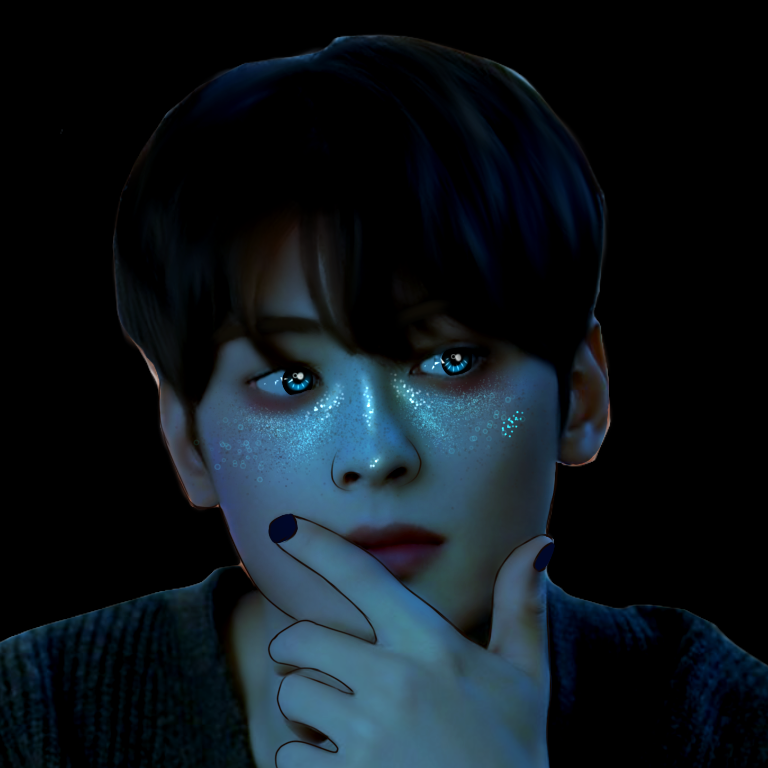
Step 4:
After duplicating the layer, focus on the second picture. Go to the filter settings in IbisPaintX, click on Adjust Color- Color Balance and play with the hues and the tones until you get what you desire. Since a blue color scheme was requested, I stopped when I got an aqua bluish shade.

Step 5:
Then comes the easiest part. Use smudge and smudge the hair out. I used Airbrush (Triangle). Keep the opacity of the brush low and then use it on the hair. Once that is done, select the blur tool- Airbrush (Normal), again with a low opacity, blue the face and the hands and the neck. Smudging and Blurring help to remove pixels and even the skin.
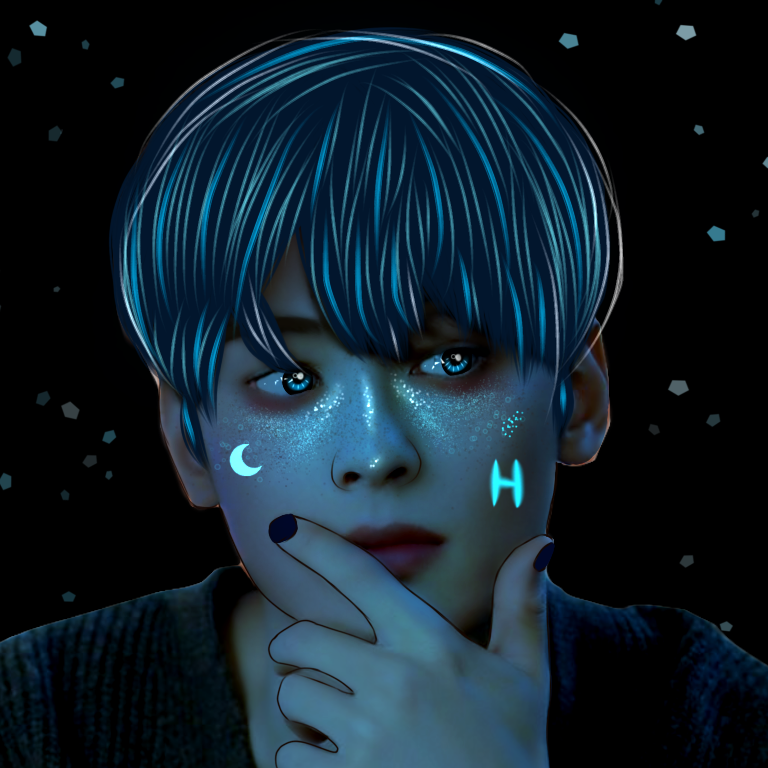
Step 6:
I struggle with this step a little too much because of shaky hands lol. Before I elaborate on this step, I have used a lot of custom brushes while making this icon. Knowing that not many people have those, I will write down the substitute brushed that could be used instead. I used the face outline brush, but you'll can use Soft Mapping Pen (Bleed). Take a darker shade, for instance, I have used royal blue and outline the face and the fingers. It is very similar to how you outline your drawing. I also applied the same color nail paint to give it a cool look.

Step 7:
I honestly was not going to do this. It was totally unplanned, but it came out so well when I did it and I couldn't be prouder of myself. I am talking about the under eye-bags. For this, change the Blending Mode to Overlay. choose an Airbrush (Normal), select a shade of brown, apply it under the eyes, on top of that, change the color to maroonish and add it on the brown. Voila! Convincing eye bags.

Step 8:
Let's work on the eyes now! Keep the same Airbrush, long press on the white part of the eye and the color you get, paint on that part. Repeat the process but with the black irises. Once you're done adding the same color on the eyes, select a new layer. Set the Blending Mode to Add. Choose a light and bright shade of blue. Switch the brush to Dip Pen (Soft). Turn the force fade on and make it to 100 and draw small arcs. Make a new layer, Blending Mode: Add, select a lighter color or blue (lighter shade of the blue you used to draw the arcs). Draw small lines in the arc.
New layer, choose Add, and draw two white circles above the arc with the Dip Pen. Change the brush to Blue Circle (Out) and tap next to the white circles. Time to do another layer! Make little lines or triangles to use them as eye reflection. Keep the blending mode as add. These are all the manipulations done to the eye.

Step 9:
Add Contour. Contour is very important. Select Airbrush (Normal). Set the Blending Mode to Overlay. Choose a darker shade of brown and contour it, baby! I also applied a little lipstick to make the lips look darker.

Step 10:
Now, comes the fun part. Before we proceed, I might forget to inform you to make a new layer. But, you're supposed to make a new layer for every time you start something new. Let's add freckles. Take a shade of brown, select the Sequin pen (alternative), and decrease the pen and opacity size if necessary. Add the freckles.

Step 11:
Let's highlight the face now. We will highlight it twice. This means two different layers, the first set to overlay, and the second one to add. The first layer is the base highlight. Turn on force fade once again. Choose a light shade of blue, Airbrush (Normal), brush it over the nose and the upper part of the cheeks. Then, on the new layer, decrease the size of the brush and make small lined on the nose, around the eyes, and the tip of the nose. Use the lasso tool to blur those lines a little.
Step 12:
Go highlight town (am I using the expression correctly?) on the model!! Three layers, all set to add. I used three different custom brushes. All different kinds of highlights. Painted one near the eye, one continuing under the eyes and one just above the contour. You can use the sequin pens, the sputtering brushes, and pointillism brushes for the wanted outcome. In fact, you can go crazy and add hearts. Whatever you want.
Step 13:
Okay, now for the part where I got lucky. The hair. I took an Oil Hair (Brush), painted the first layer with royal blue hair. Then added different strokes of different colors on the hair to make them look nicer? Then I realized that it was too bright and selected a new layer to brush the color of blue over the hair highlights to tone them down a bit. You can go on YouTube to watch hair tutorials because honestly, I suck at them.

Step 14:
Then I got a cutout of the moon, painted it a color of blue, set it to add. Added the letter "H," using a Dip Pen and added Hexagons in the background.
That is it for this tutorial! If you have any doubts or did not understand something because of my shitty explanation, feel free to comment here or pm me.
════════════════════
Bạn đang đọc truyện trên: AzTruyen.Top