3.2 Construct a Detailed Plot or Outline - Additional Resources
Start Small
From Sona Charaipotra: "When you begin to plan your project, start small! Then let it snowball. I admit, my longest outline was a hefty 40-plus pages. But you don't have to go that far to get yourself on the road to a happy, fulfilling Camp NaNo experience. Even a skeleton outline will do as long as it keeps the story going. Here's what I do to get moving:
Start with your elevator pitch (a one-sentence run down of the who, what, where, when, and especially why of your story).
Expand that one sentence into three: beginning, middle, end.
Expand those three sentences into three paragraphs for the beginning, middle, and end, adding details to each section.
Break those three paragraphs into multiple paragraphs for each section, adding even more details—and turning those details into potential scenes.
Group the scenes (and use flashcards if you want to, for easy movement) into paragraphs of action, which then magically become chapters!
Voila, you should now have a skeleton outline featuring three sections of multiple paragraphs outlining your chapters by beginning, middle, and end."
—
Sona Charaipotra first worked as a celebrity reporter at People and (the dearly departed) TeenPeople magazines and has been a contributor to publications from the New York Times to TeenVogue. She's the co-founder of CAKE Literary, a boutique book packaging company with a decidedly diverse bent, and the co-author of the YA dance dramas Tiny Pretty Things and Shiny Broken Pieces. She's also proud to serve as the head of content for the non-profit We Need Diverse Books.
~~~
Subway Map
Gabriela Pereira shares her method of mapping out her story:
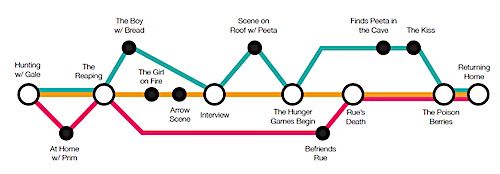
As a New Yorker born and raised, I think of an outline as being like a subway map. What I love about this approach is that it allows you to see how the various threads of your story work together, but you can also tease those elements apart and look at them individually to see how each thread holds up on its own.
When you make a subway map outline, each line represents a different subplot or story element you want to track. The dots (or stops) represent scenes in your story. Some scenes are like local stops on a subway and apply only to one story thread, while other scenes are like express stops and represent intersections between the story threads and mark key moments in your story. For an example of this technique in action, check out the subway map of Suzanne Collins' The Hunger Games.
Step 1: Write out your scenes.
List out all the scenes in your story or novel. I like to use index cards for this step because it allows me to move scenes around and also look at each one apart from the rest of the story. On each card, I'll give the scene a title, then list the major characters who appear and what happens in that scene. I also make a note to myself about why the scene is important to the story overall because if I can't think of a compelling reason for that scene to exist, then I should consider cutting it altogether.
Step 2: Choose which elements to track.
You can track just about any aspect of your novel or story with this mapping technique: multiple plot lines, different points of view, and recurring images or thematic elements. You can even use story-mapping to keep track of your supporting cast and which characters appear in which scenes. To avoid letting your map sprawl and become out of control, I recommend focusing your map on either plot, character, or imagery. Once you have chosen which elements, I recommend color-coding your scenes according to the thread (or threads) where it appears.
A plot-centered map focuses on your novel or short story's main plot and subplots, and each of these threads has a dramatic question that drives it. In our Hunger Games example, the main plot concerns the major dramatic question (MDQ): "Will Katniss survive the Games?" This book also has a series of subplots driven by lesser dramatic questions (LDQs), like "Will Katniss return Peeta's affections?" Notice that the dramatic questions—both major and lesser—focus on the protagonist since this is the character driving the story.

A character-centered map is useful if you need to keep track of a sprawling supporting cast or are using multiple points of view (POV). For this type of story map, instead of worrying about MDQs for the different plot threads, you will need to think of dramatic questions specific to each character you are tracking. This question usually centers around that particular character's biggest desire. For example, the dramatic questions for characters in the movie The Wizard of Oz would be: "will Dorothy ever get back to Kansas?" or "will the Scarecrow finally get a brain?"
An imagery or theme-centered story map can be useful when you need to track recurring images or thematic elements as they appear throughout your story. The elements you track with this type of map can be anything (e.g. music, color, art, weather, nature, etc.), but relate to the emotions you want to make your readers feel. This type of story map is extremely powerful because it helps you understand and enhance how your readers experience your book.
Step 3: Create Your Map
Once you have created your scene-by-scene outline and labeled each scene according to the various threads or elements you want to track, the only thing that remains is to draw the actual map. Start by plotting the scenes where two or more threads intercept (the express stops), then fill in the other scenes (local stops) around those pivotal moments.
With this map, you'll be able to look at how different plotlines, characters, or thematic elements intercept, but you can also pull these threads (subway lines) apart to see how they work independent of the rest of the story.
While this approach might look very different from a traditional outline, you can easily extract a list outline or spreadsheet from your map. You can also adapt this technique and use it in concert with other types of outlines. As you gear up for NaNoWriMo, the most important thing is for you to find an outline technique that works best for you, and I hope you will give story mapping a try.
—
Gabriela Pereira is an author, speaker, and entrepreneur who wants to challenge the status quo of higher education. As the founder and instigator of DIYMFA.com, Gabriela teaches at national conferences, regional workshops, and online. She is also the host of the podcast DIY MFA Radio and author of the book DIY MFA: Write with Focus, Read with Purpose, Build Your Community (Writer's Digest Books, 2016). Go to DIYMFA.com/storymap to download a print-friendly version of the story map from this post.
~~~
Fast Drafting
Bestselling author J. Elle shares some pro tips for fast drafting.
Start with a SHORT story pitch.
Pitching a story in a few words is tough. But it's a worthy effort and the best use of your time before you get any words on the page. Why? Because it helps you hone in on the core of your story and its hook. A good short pitch involves the character, their dilemma, and a hint of the stakes. In October of 2018, I pitched my YA debut novel in a tweet which then blew up. Not many words can fit in a tweet, but by choosing the right set of words, I was able to convey the heart of my story, and it really resonated. (From that tweet, I signed with a literary agent and sold my debut novel to a Big 5 publisher in a six-figure deal.) The biggest favor you can do for yourself is understand the story—its essence, its core—you're trying to tell before you start drafting. And that's hard. But the more you play around with creating a short pitch, you'll begin to see a clear snapshot of what your book is going to be about. That's your jumping-off point.
2. Expand your pitch into tent pole beats.
From your short pitch, spend some time deciding on what your major beats are. Now, yes, this is a bit like outlining. And for you pantsers out there, I empathize with you. I was a pantser and still am in many ways. But I still do this step because this step ultimately saves me time. The beauty of fast drafting is that you know what you need to do when you sit down to type. So a lot of these steps are about doing pre-work so that when you sit down to type, you're not spinning your wheels to figure out what to type. Instead, you'll have a clear goal, and you'll be ready to execute it. Also, note that the goal isn't to perfect each of these steps but instead to try to do each step to the best of your ability and in a way that makes sense.
I could write an entire piece on beat sheeting novels (which I love and do for all my books), but for the purposes here, I've organized the main things you want to know below in a series of questions. Simply answer each, make a chart if you like that sort of thing, and once you have each question filled out in a way that logically makes sense, move on to the next step. (NOTE: It's a good idea to get feedback on this step if you have critique partners and fellow writers you trust.)
Opening Scene - Who is the character before the world changes?
Inciting Incident - What happens that forces them to make a choice, changing their lives forever? What are they choosing between?
"A" Plot - What is that choice they make? What are they pursuing or working toward? Finding information? Going on a quest? Uncovering the truth behind a murder?
Stakes - What are the stakes of the "A" plot? What's at risk if they fail to accomplish whatever they're pursuing? It should be something that personally affects them or someone/something they care about.
"B" Plot / Character - Who or what is the theme of the story? What character in your story is going to embody that theme and play a key role in helping the main character change?
Midpoint - what happens in the middle of the book to change the character's direction. Usually, it's some bit of new information, or they realize things are not as they seem.
Stakes Raise - How do the stakes (what's at risk if they fail) rise after the middle of the book?
Character Arc - what does your character believe about the world in the beginning of the book that by the book's end, they will no longer believe? (An extension of this question is: what things can happen in this character's life to facilitate them incrementally learning this big truth? If you don't know this question right off, that's okay. But this is a question you want to go back to every now and again, even after you finish the first draft, to ensure your character is actively involved in a plot that is resulting in their change.)
Failure - How will your character fail big? This happens at about the 75% point of the book, and it's the final moment of failure, usually, before they pick themselves up off the ground (figuratively or literally) and learn the lesson they've needed to learn. From there forward, they act on their new belief to the end of the book, demonstrating how they're changed.
If you'd like a more in depth look at how to beat sheet a novel, I strongly suggest reading Jessica Brody's Save The Cat Writes A Novel.
3. Flesh out your beats into a detailed synopsis.
Now the fun part! This step is the most helpful thing you can do to enable yourself to fast draft.
Write a mini version of your story, also known as a detailed synopsis. The key to writing synopses is not to worry about the voice, but instead what happens. Try to convey what happens and its impact on the character to show how the story moves from tent pole moment to tent pole moment (per the step above). This takes some trial and error and you may get annoyed with yourself because it's not as easy as it seems. But, I've seen that if you can write a compelling and cohesive synopsis, the draft that you execute will be far stronger and more efficiently executed.
Definitely get beta feedback on your synopsis from writing friends you trust. It's worth going over this a few times to get it right. In terms of length, aim for 3-4 pages for a middle grade novel and 5-10 pages for a young adult or adult novel. These are just general guidelines. My latest YA novel required a fifteen page synopsis and I am very glad I did it because it conveys the tone, arc, and plot of the novel and the main plot threads quite well, which allowed me to draft the first 23,000 words of the story in five days.
4. Summarize each scene.
(Note: a chapter can have more than one scene.)
Okay, we're getting really close to writing! Now that you have a mini version of your story, consider how you will break it up into scenes. This doesn't need to be perfect, but spend some time figuring how to stretch your synopsis into a full novel. Give each scene a short summary. Aim for a few sentences, no more than a paragraph, just so you know what needs to happen in that scene (or scenes). Do not skip this step. I repeat, do not skip this step. This step allows you to sit down and execute the scene without figuring out what to write. The "figuring out" part is where a lot of writers slow down. Do that in the summaries so when it's time to draft you are ready to execute, not sort out details.
5. Write with a goal in mind.
Plan your writing days. I'm not talking anything extensive here. Just grab your phone calendar or a post-it note and write down which days you want to do which scenes. Then on writing day re-read that summary and execute it. If you've done all the pre-work the words will fly from your fingers. Don't worry about grammar, typos, reading back what you did. Insert fillers such as, "TITLE" or "NAME" for details you haven't worked out yet. Just get the scene that you've summarized out. The goal is to finish the draft. After that is when you make sure it all works together through revisions and fill in the details. Right now the goal is finishing the draft. It literally just needs to exist!
If you've done all five steps, pat yourself on the back because congrats, you're ready to fast draft! Don't hesitate to tag me on socials if you try this method out and it works for you. I'd love to hear how it goes!
—
J.Elle is the New York Times bestselling author of Wings of Ebony. Elle has a Bachelor's of journalism and an MA in educational administration and human development. She grew up in Texas, but has lived all over, from coast to coast which she credits as inspiration for her writing. These days the former educator can be found mentoring aspiring authors, binging reality TV, loving on her three littles, or cooking up something true to her Louisiana roots.
Website: WingsOfEbony.com
Twitter: @AuthorJ_Elle
Instagram: @AuthorJ.Elle
TikTok: @authorjelle
~~~
3 Tips to Avoid a Soggy Novel Middle
https://youtu.be/e8hczEXlrOg
6 Ways to Add Suspense to Any Story
https://youtu.be/VmZnbhsOOqw
Bạn đang đọc truyện trên: AzTruyen.Top