☞ Tutorial #23 - Simple Typography Book Cover | unlocked
Tutorial #23
• Simple Typography Book Cover •
~*~

App/s Needed
• PixelLab
• PicsArt
×------------------×
Unlocked! 🔐🔓
Goal Achieved ✔
~~~~*~~~~
Step 1
Open Picsart and go to Pick Canvas. Then put the exact size for book covers "512×800".


Step 2
Automatic na mapunta siya sa draw then click edit image. Then add ypur desired tumblr/aesthetic background. After that, click save.
Step 3
Go to PixelLab. Click the three vertical buttons above and click use image from gallery to add your background.

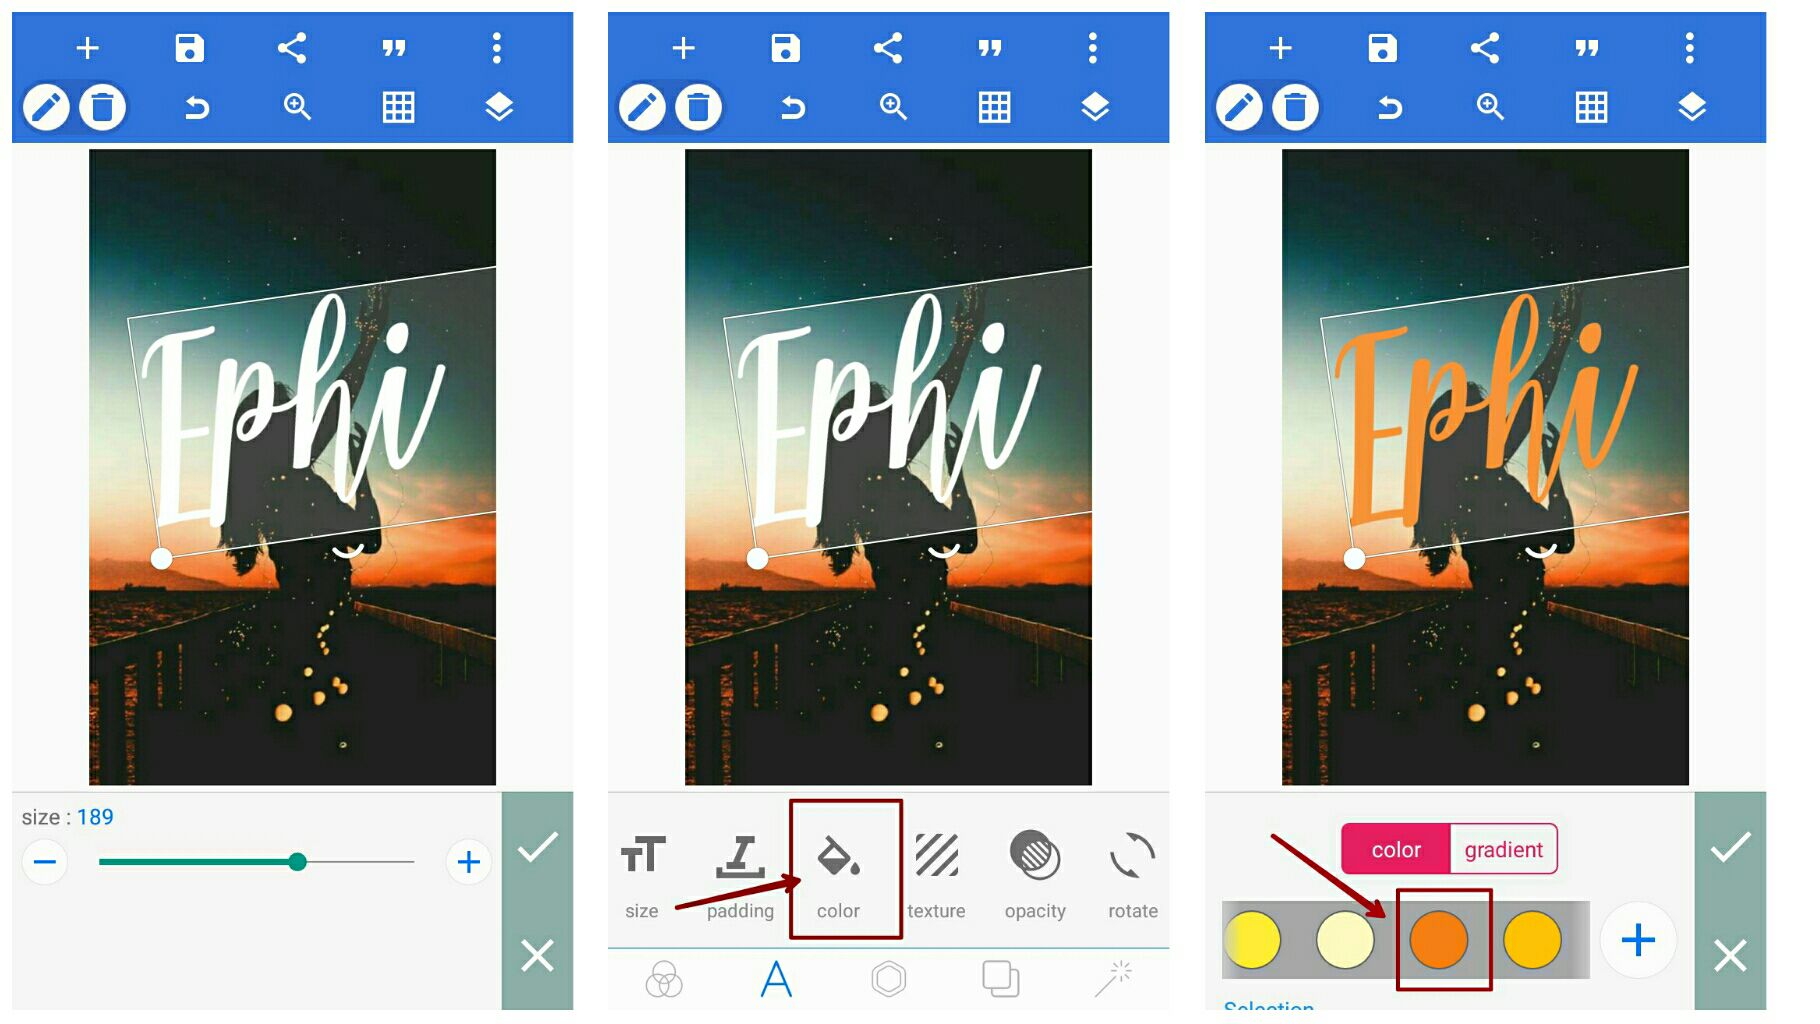
Step 4
Click text then add your title (Since one word lang iyong title ko tapos mahaba, pinili ko siyang hatiin into two words. So inuna ko muna iyong Ephe) Next, go to font choose your font. I suggest na sa mga simple typography, mas maganda pag mga cursive fonts.
I used Modena font.
ps. I mispelled the title while doing the tutorial. The original is Ephemeral. Not Ephimeral t_t. Bago ko lang nanotice nung pag edit ko nitong screenshots.

Step 5
Adjust the size. Iyong tamang laki lang then ikaw na bahala kung lagyan mo ba ng spacing or slant mo ba ng kaunti.
After, go to color. I used orange since dominant siya sa background na ginamit ko.
tip: Make sure to pick the right color that fits your background. Halimbawa, violet/blue/pink iyong shade, then much better kung dark violet iyong base na color.
Step 6
Go to copy tool. Copy your text. Go to color again and pick light color from ypur base. I chose pastel yellow since orange iyong base. Put it in the front of your first text tapos ilagay mo siya na parang naka shadow or 3d iyong back text mo.
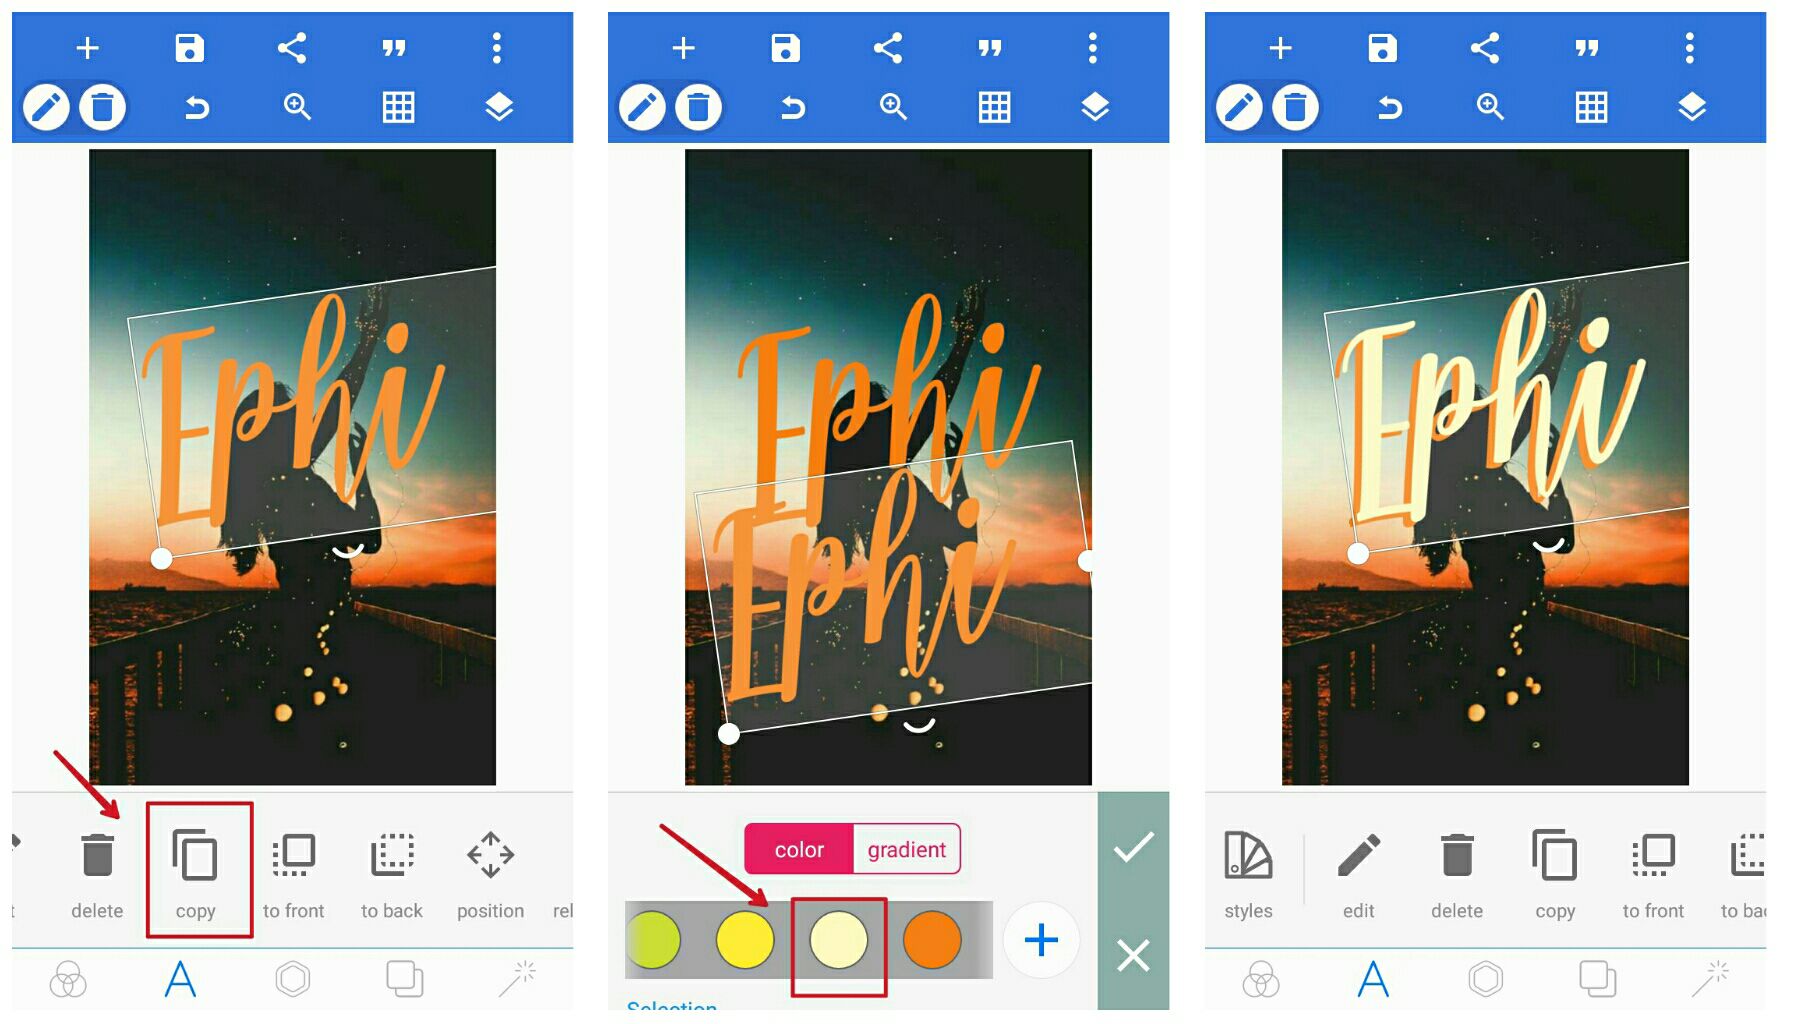
Step 7
Use the same process as what you did for the first text. Since Ephemeral iyong title, ti-nwo word ko siya tapos meral iyong sa ibaba ng first text. Kung 2 or more words ang title na gawan mo, then much better.
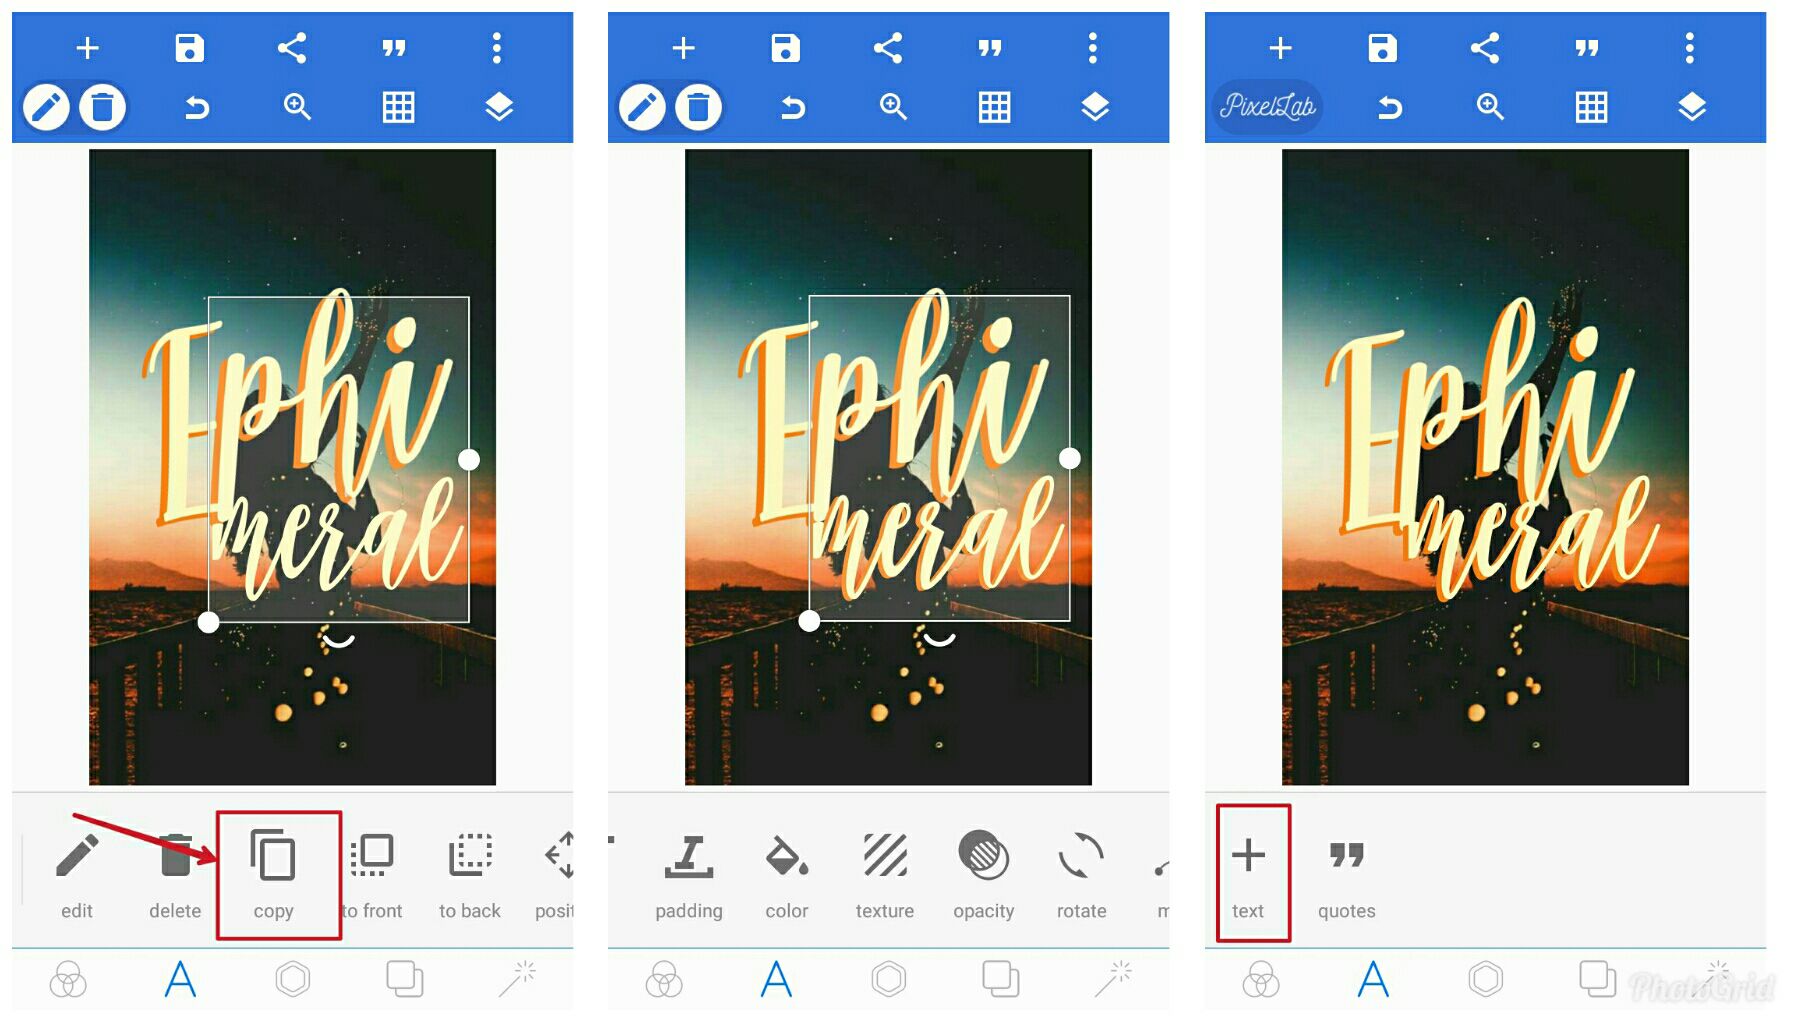
Step 8
Add text again for your quote if meron man. Ilagay mo iyong subtitle kung saan bagay. Kung sa cases na ganito, (like mahaba iyong subtitle), hinati ko iyong phrase. Sa left side sa taas ng title, then right side naman sa baba ng title. Lagyan mo ng spacing, then, style - bold - italic.
Same process with the author and your watermark. Huwag masyadong liitan, iyong visible pa rin siya na mabasa dapat.
Font I used for the subtitle/watermarks is Ariel.

Step 9
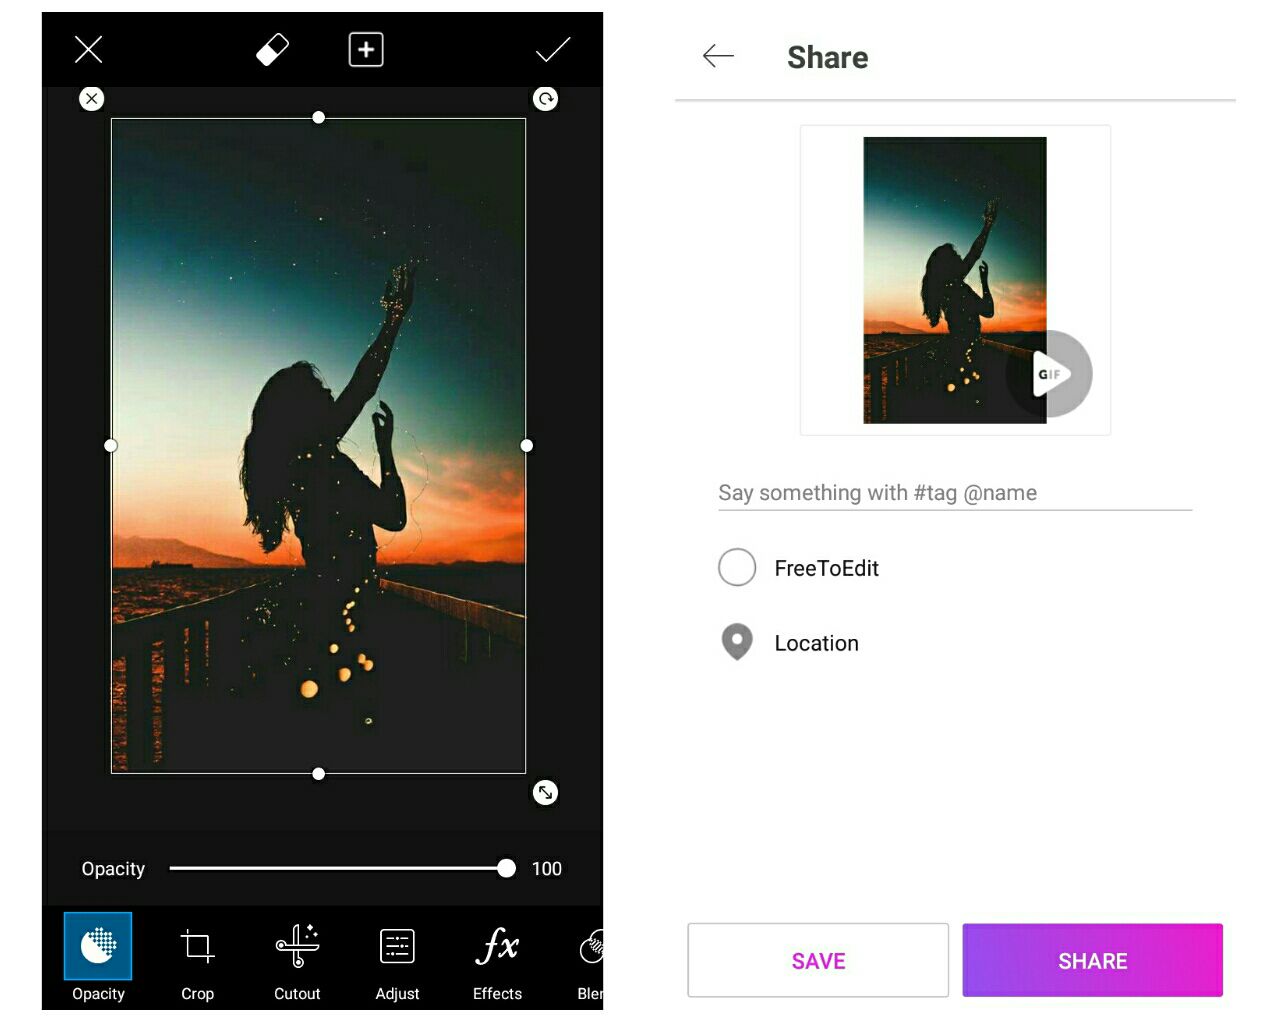
Click the fourth icon below and then transparent. After, click save.

Step 10
Go back again to PicsArt and add the texts you've made in PixelLab.

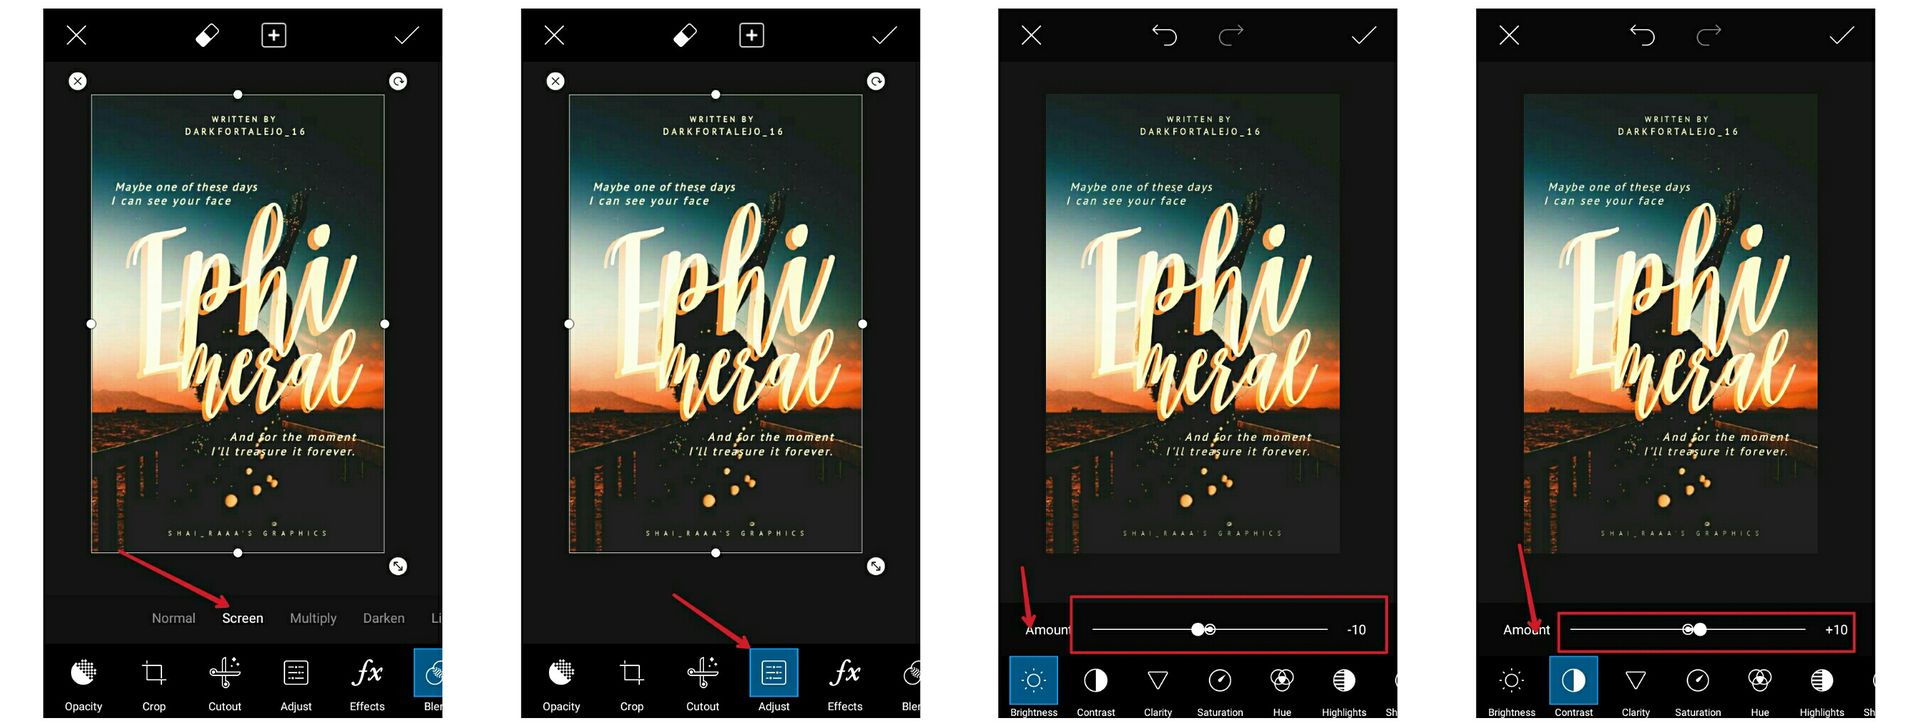
Step 11
Go to blend and click screen. This is optional or nagdedepend sa background na gamitin mo. Hindi siya appropriate basta light iyong background na gagamitin mo.
After clicking the screen, go to adjust and then adjust the brightness and contrast para mas kita iyong texts mo.
This process depends on you. Basta kung ano sa tingin mo ang bagay, then huwag mo na galawin iyong original na blend ng texts :>
Step 12
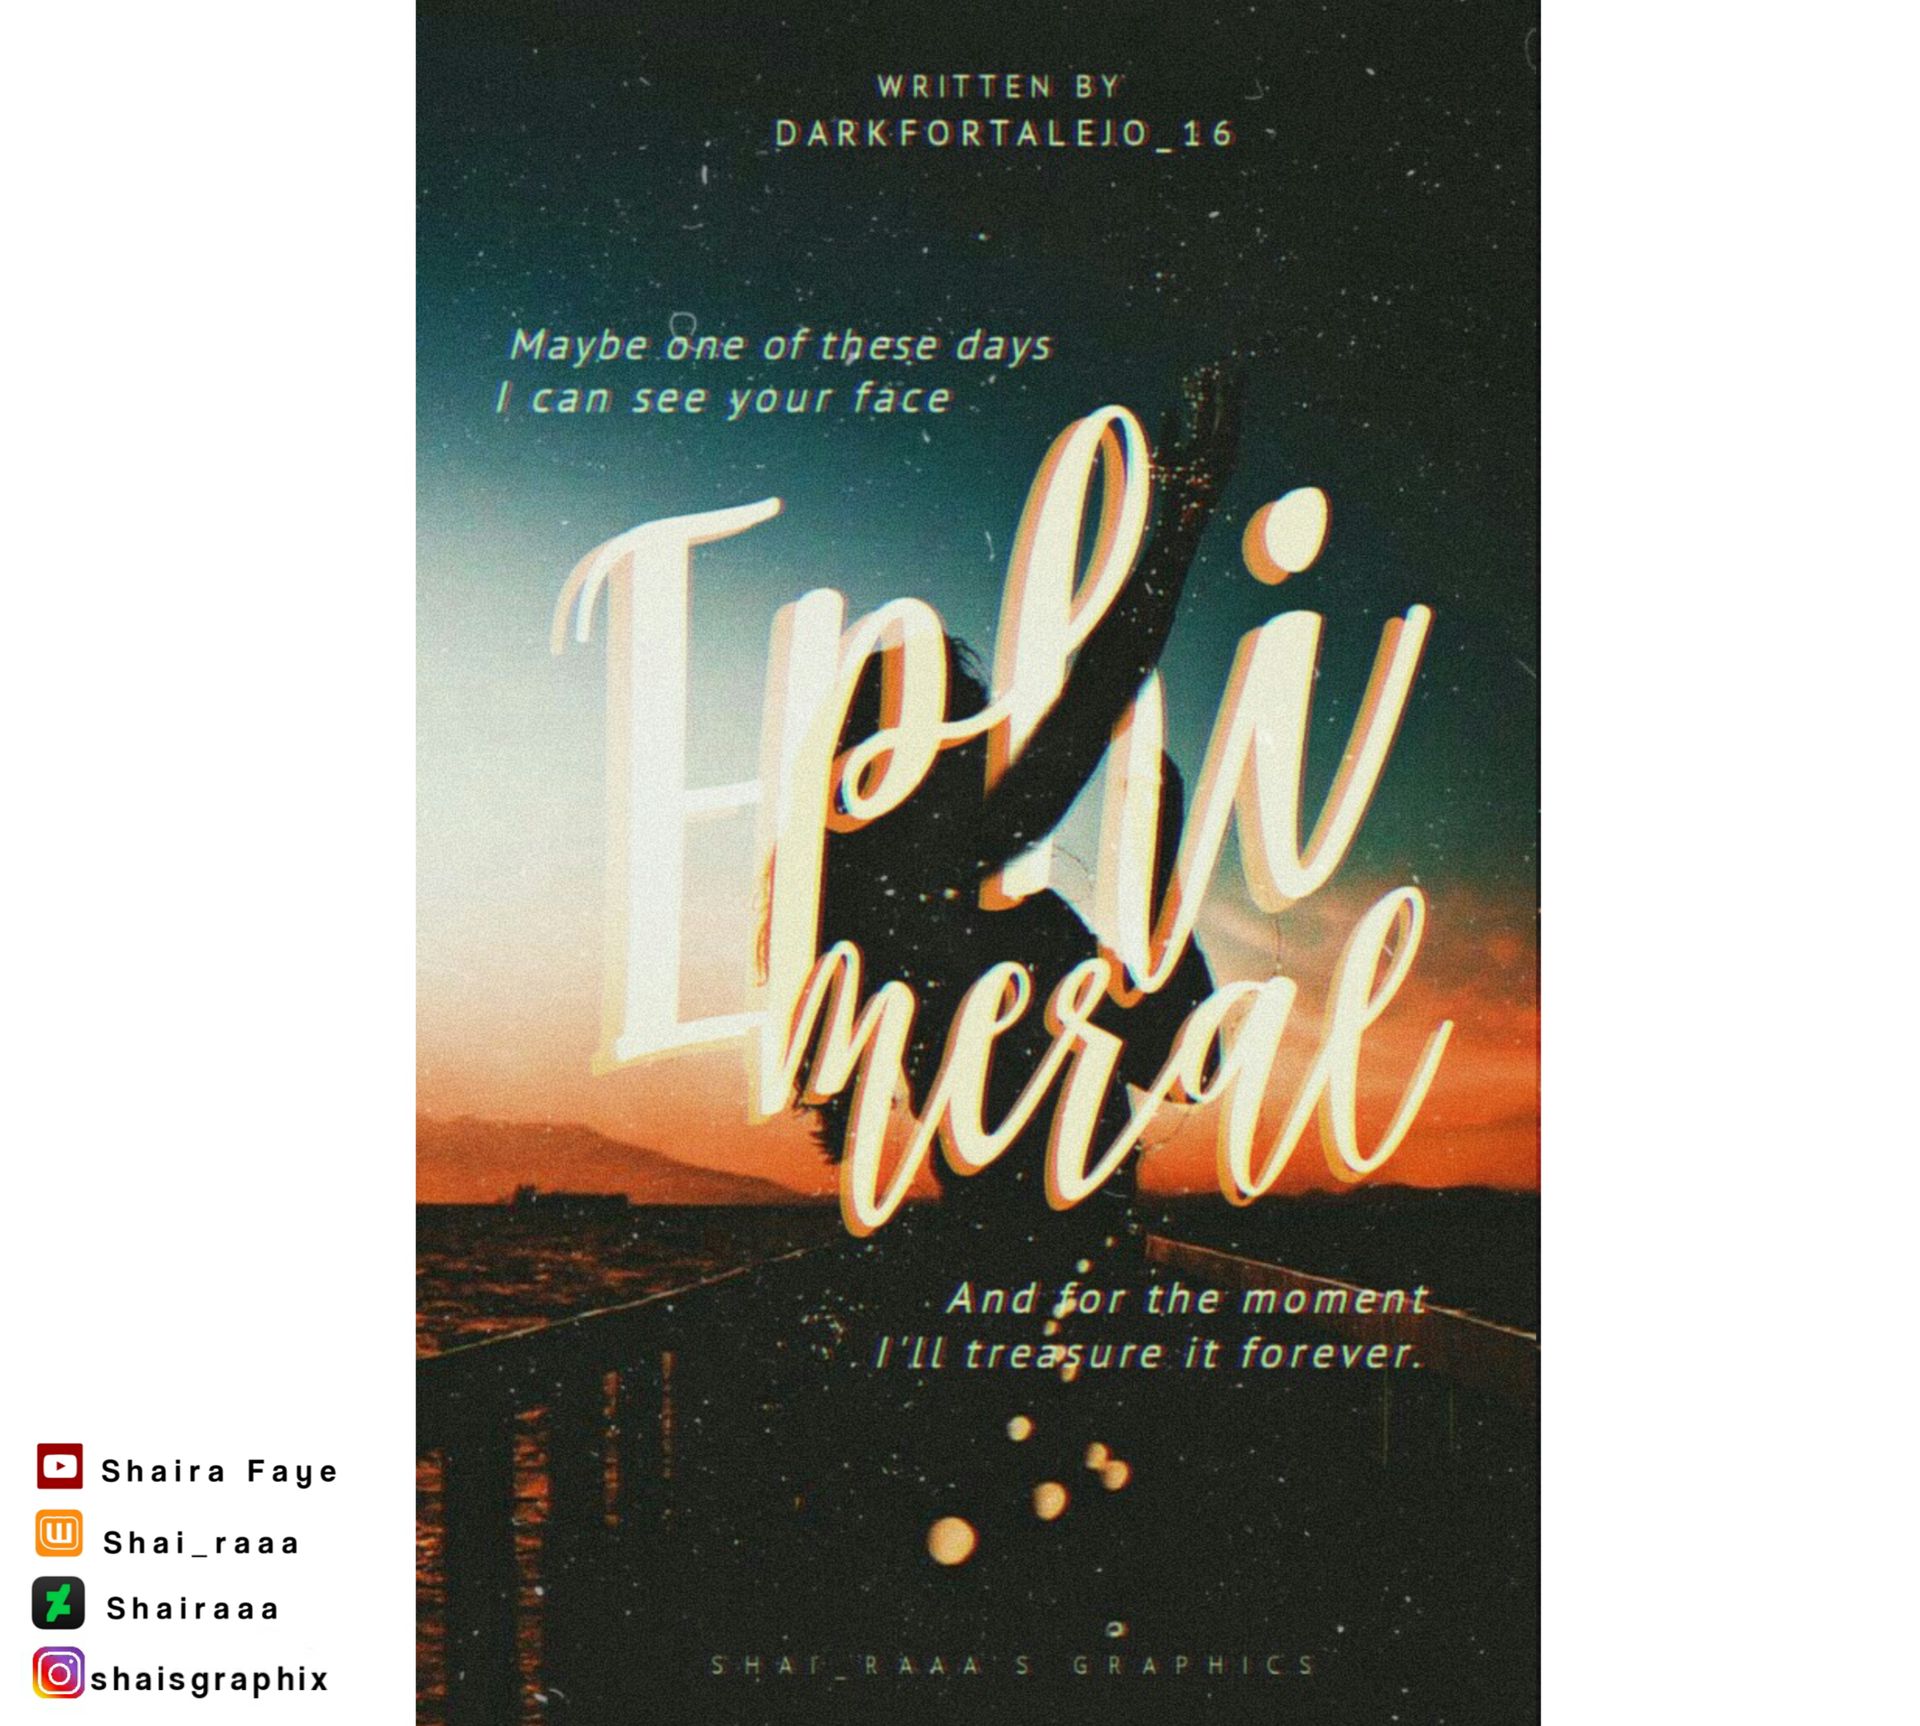
After, I erase some parts of text. (still depends on the background used)
*please base on the picture below*

Step 13
You can then add effects. You can add either on vsco or just in picsart. I used GRNG, MIL2, HDR 2.
You can also add textures/overlays for effects such as dust texture.

Step 14
If you're done, then click save!!
Okayy sorry if the result is not the same on what I've made before. Nalimutan ko na talaga anong effects ginamit ko roon but still, it's simple typography book cover hehe.
~~~~~~*~~~~~~
Note: As for the background, you can find many on pinterest by searching tumblr backgrounds. Or you cam visit my pinterest (shaira faye). I have a board there titled "tumblr bg's". And also other boards like stock model, backgrounds. Baka lang makatulong para sa resources :>
Thank you for reading and I hope this tutorial helps you. Don't hesitate to comment below if ypu have any concerns or questions regarding this tutorial. :))))
~~~~~~*~~~~~~
asjdjdldgl-- ang tagal ng hindi na-uupdate tong tutorial book huhuhu. Sorry guys :'((( I'll try to post tutorials and maybe I'll also start posting about ibis tutorial here.
Sorry again and thank you for understanding~
S H A I ♡
Bạn đang đọc truyện trên: AzTruyen.Top