[T] Making Icons on PicsArt pt. 1
its been a long time since the long update. i come back with a new tutorial which includes picsart, not photoshop! i cant make any graphics at my laptop lately since school keeps me busy all the goddamn time, and final is in a week!:") so its just me and picsart this time.
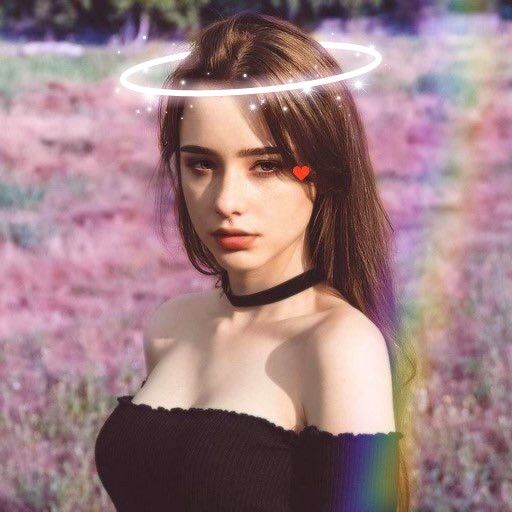
today I'm going to show you how to make this aesthetic cute icons!
ex;

apps needed :
- pinterest (resources)
- picsart (new version, im using 9.35.1)
magic spell : creativity!
okay so here is it!
Tutorial : How to make cute aesthetic icons using picsart part 1!
FAKE TOPAZ
Well, a lot of good pictures in pinterest some times are in a bad quality. I'm going to show you how to add a fake topaz effect so it'll look more hq.
di pinterest tuh banyak gambar ucul2 tapi qualitynya uh banget burek2. jadi disini aku mau ajarin cara ngasih fake topaz effect biar kliatan lebi hd gambarnya!
1. open the picture you want to use! in frame : Diana Korkunóva (she's super cute and has a lot of aesthetic photographs)
buka gambar yg mau kamu pake. modelnya disini aku pake Diana Korkunóva, dia ucul bingitz trus poto2nya tuh estetik gitu.

2. go to fx (effects) > blur > blur. set the blur to the lowest number, here i use 3. you could use 2/4, just not too much. then go ahead and play with the fade opacity.
klik fx (effects) > blur > blur. Set blurnya ke angka yang rendah, disini aku pake 3. kalian boleh pake 2/4, pokonya jangan banyak2. trus kalian bisa atur2 fadenya sesuka kalian deh.

3. Sometimes, i find it to blurry for the eyes. so click the eraser tool above the picture, and erase the eye part ( idid the same to the eyebrows too). it doesnt effect the picture that much, so you might not notice the difference. if you're done, click the checkmark.
Kadang, menurutku bagian matanya itu terlalu blurry. jadi klik tool penghapus yang ada di atas itu, sblhnya tool undo, trus hapus bagian matanya dikit2 (aku hapus bagian alis juga). ini ga terlalu ngefek sih, jadi mungkin kalian agak gapaham bedanya dimana. kalo uda, pencet tanda centang.

BLUSH
i realize that blush and freckles is a thing now, and i'd like to show you how to make blush (i cant make the freckles tho) you might need pink/red textures.
jadi sekarang jamannya blush ama freckles hampir di setiap graphic. disini aku mau ajarin cara buat blushnya, tapi aku gabisa buat frecklesnya hwehwe. kalian bakal butuh pink/red textures.
1. add the texture. set the blend mode into multiply. you could also use overlay but i prefer multiply. once again click the eraser tool
tambahin texturenya, trus set blend mode jadi multiply (perbanyak, i think indonya) bisa juga pake overlay, tapi aku lebih milih multiply. trus klik tool penghapus.

2. we're going to erase the part except the nose and cheeks. here's how i like to do it : set the erase to full hardness and size, then delete it all. after that select the brush tool, put it in average size (30-50) and low hardness (probs 30 or less), than apply it to the cheeks and nose. if you accidentally brush another part, go ahead and erase it until you think its good enough.
kita sekarang mau apus bagian2 selain bagian pipi ama idung. caraku ngehapus itu: pertama, hapus dulu semuanya pake eraser yg size sm hardness full. trus, pilih brush tool, sizenya pilih antara 30-50, hardnessnya dibawah 30. diusap2in ke bagian pipi sama idungnya. kalo ada yang kelebihan, diapus aja. lakuin itu terus sampe menurutmu udah oke.


final result/hasil akhir :

she's so cute imma gonna cry rn:")
OKAY SO THATS ALL FOR THE PART 1. PART 2 COMING SOON;) if you have any question, please do ask through the comments.
dont forget to leave your votes! gbye lovelies <3
Bạn đang đọc truyện trên: AzTruyen.Top