twenty six || sunflower flat art

Hi, it's been a while since I made a flat art tutorial so here it is!
Btw there's 40+ steps in this tutorial, brace yourselves 👀
*I used dip pen (hard) to draw the flower
*Please check out part 1 if you don't know anything about selection
Let's begin!
----- - --- (❁´◡'❁) --- - -----
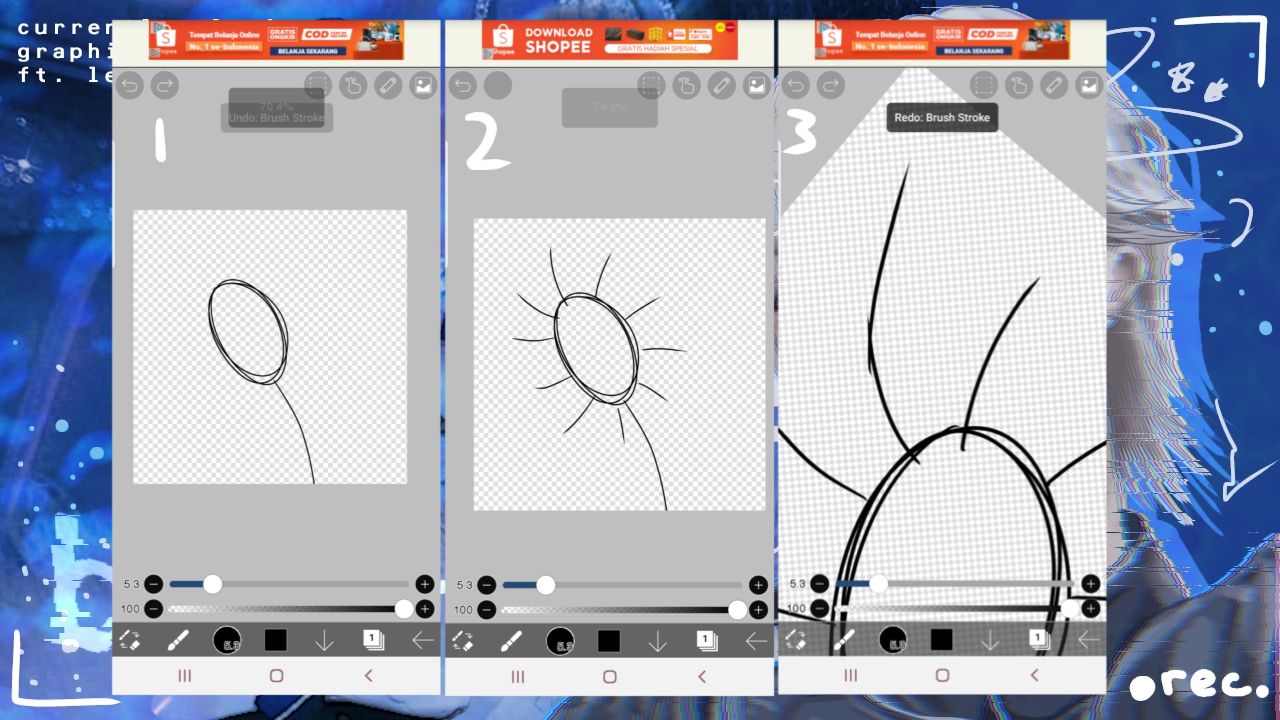
1. Firstly, we'll make a rough sketch. Draw an oval, followed by a thin line under it
2. Then draw small lines around the oval to plan out the petals
3. Elongate one of the lines
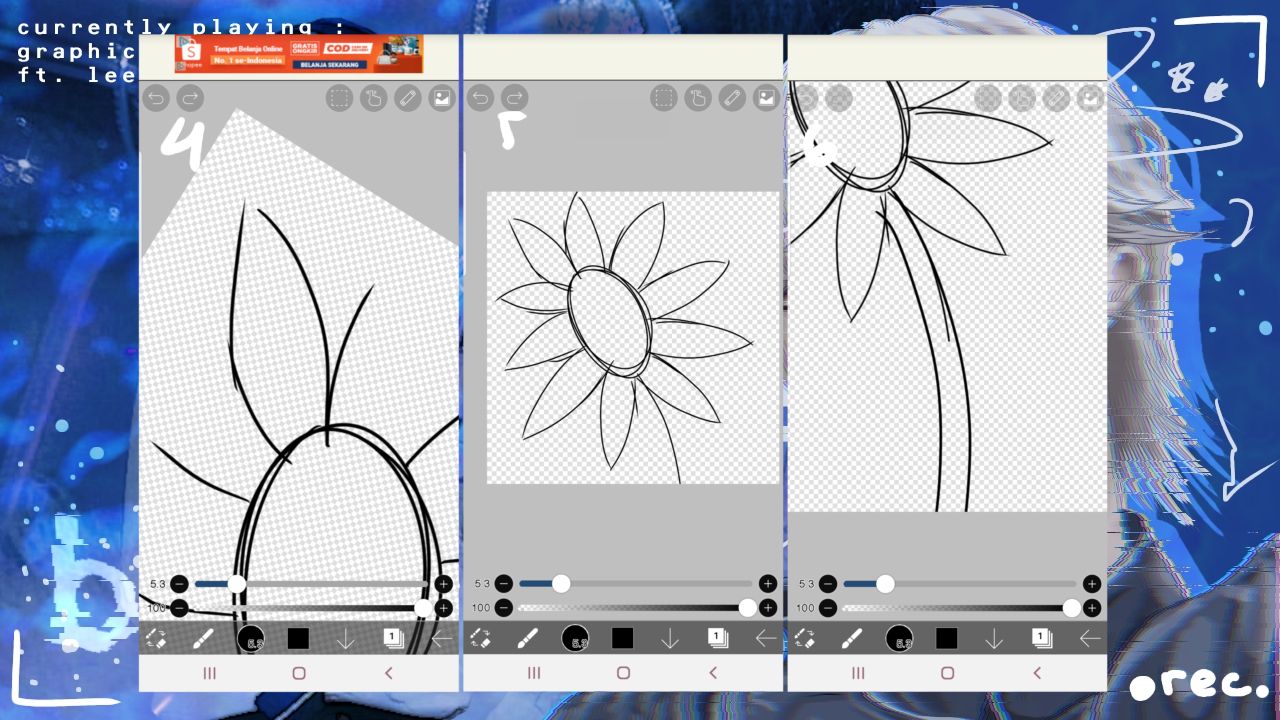
4. Then draw a slightly curved petal facing the line we drew earlier
5. Repeat on all of the petals and we have a flower!
Okay the tutorial is over-- wait no I'm joking pls don't leave
6. Thicken the stem by drawing another line under the flower
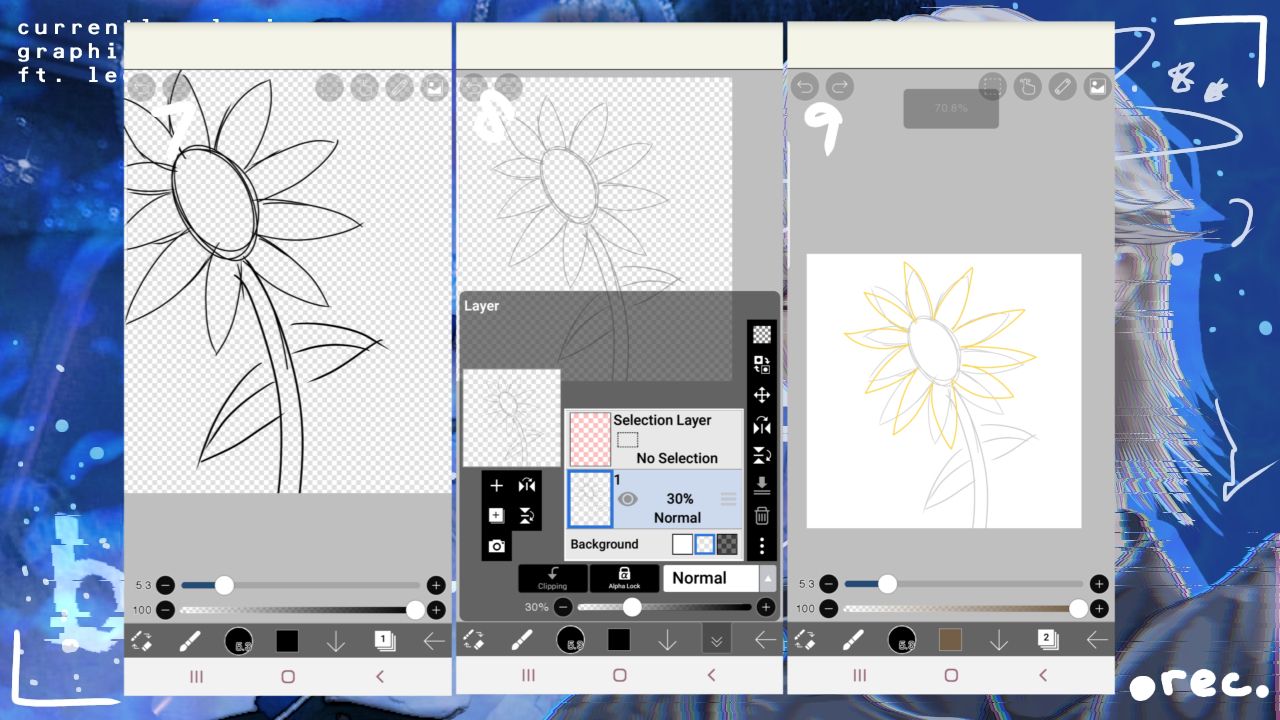
7. Then draw some leaves, it doesn't have to be pretty since this is still a rough sketch
8. Lower the opacity so we can outline it
9. ADD A NEW LAYER, using yellow (since this is a sunflower), outline the petals
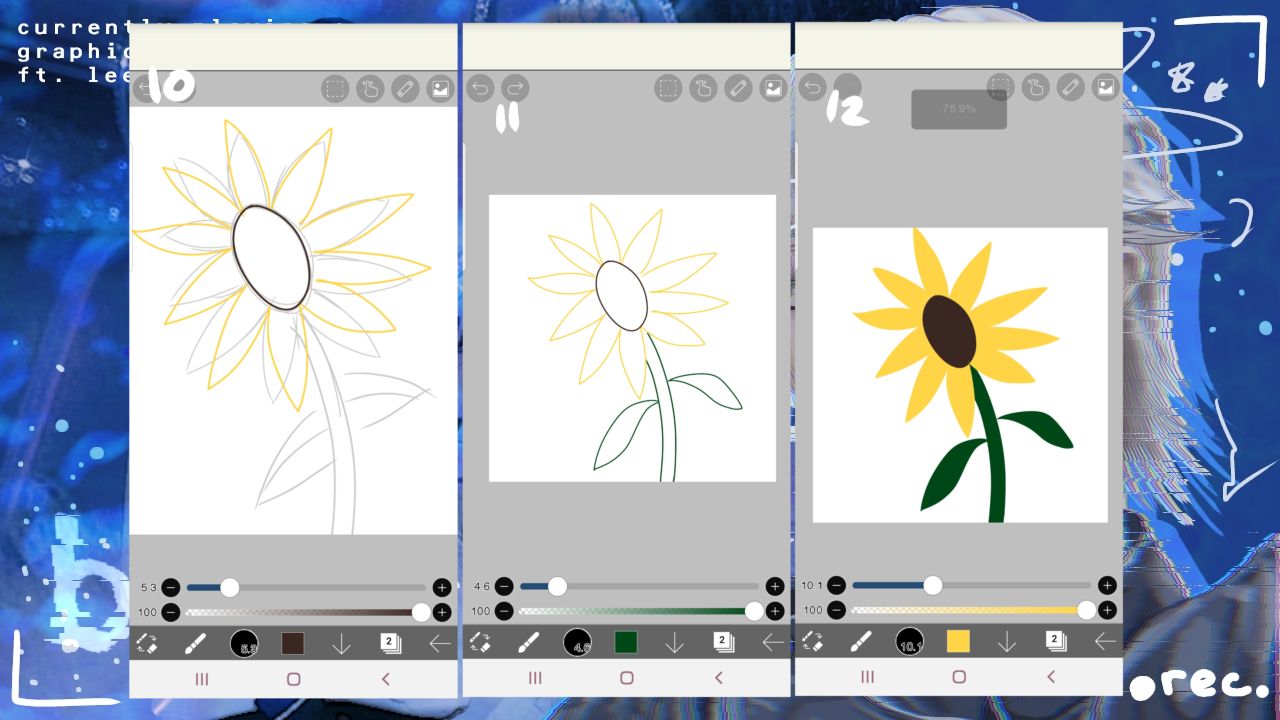
10. Outline the seeds in the middle as well
11. And the stem and leaves too
12. Fill them in with the bucket tool
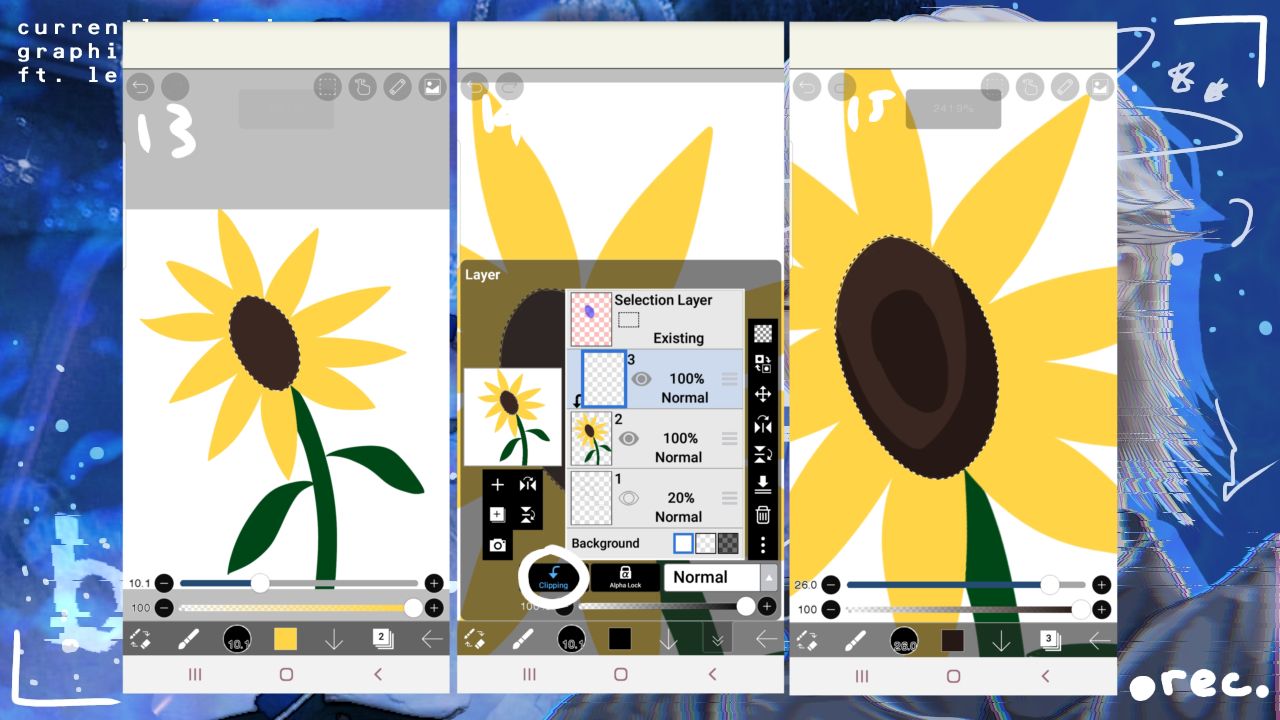
13. Select the seed (refer to part 1 of this book for the selection tutorial)
14. ADD A NEW LAYER AND CLIP IT
15. Firstly, set the direction your light source. Mine's at the left which means everything on the left is brighter while everything on the right is darker. So, pick a color darker than the seed and make a small shadow on the right. ALSO, add a smaller oval in the middle of the flower
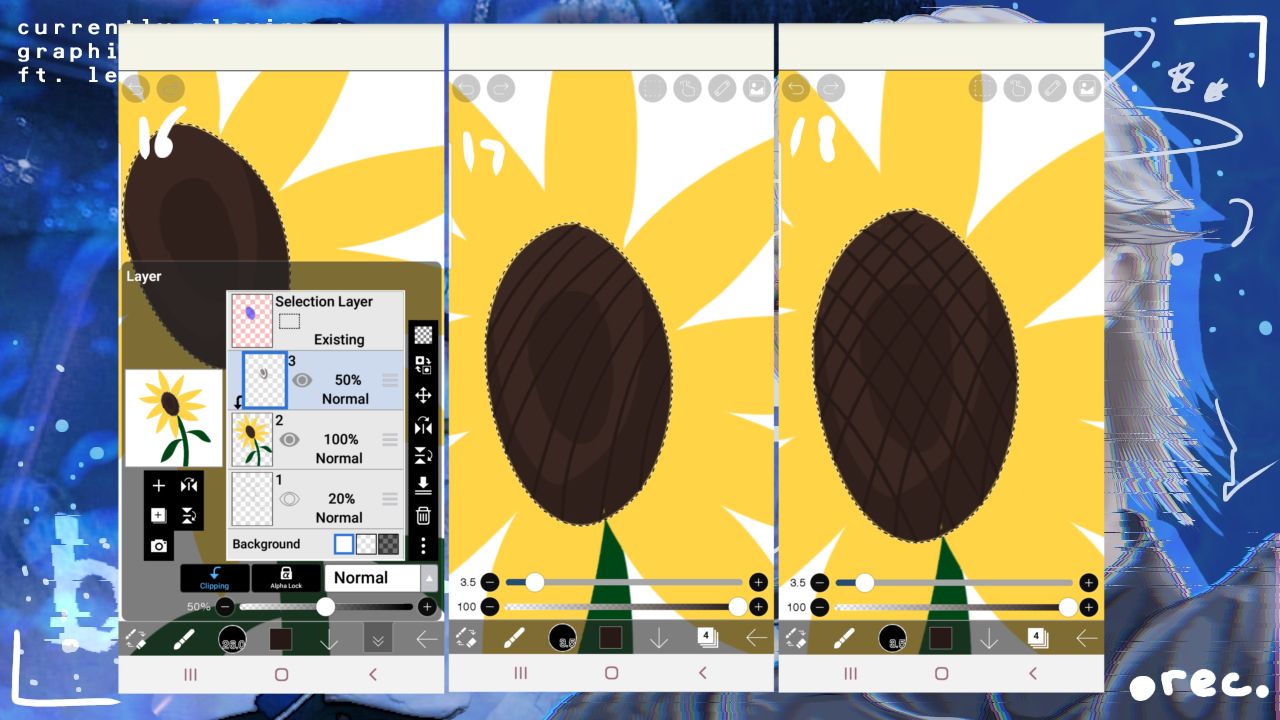
16. Lower the opacityyyyy
17. Next, ADD A NEW LAYER AND CLIP IT AS WELL, then draw lines in one direction across the seed.
18. Then criss cross it by drawing lines of the opposite direction

19. Remove the selection, then select the stem and the leaves
20. Following the same rules, darker colors on the opposite side of the light source
21. Now, with the smudge tool (the one with the fingers), strategically blur out some of the shadow so it looks a little bit more nicer

22. Next, do the same but with a lighter color on the other side of the stem (closer to the light source)
23. Smudge itttt
24. Remove the selection
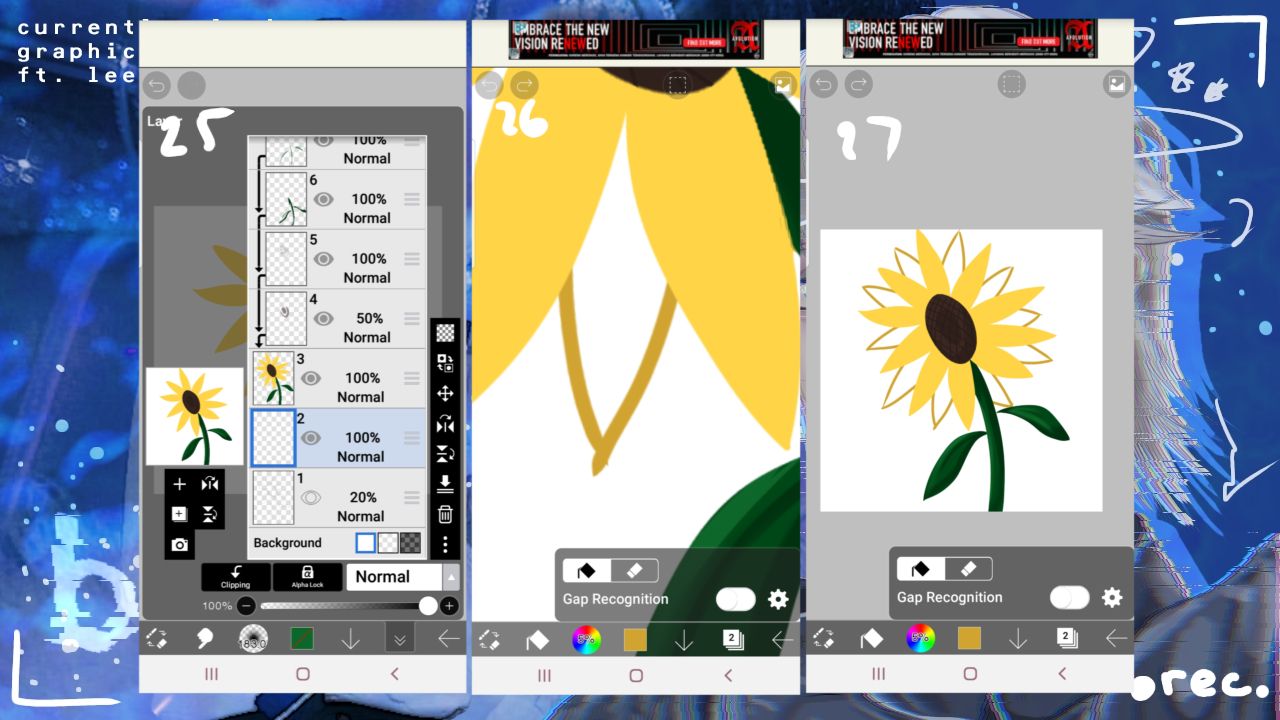
25. ADD A NEW LAYER UNDER THE FLOWER
26. Draw a petal-like shape but with a darker shade of yellow in between the petals
27. Repeat step 26 until it looks like the picture above
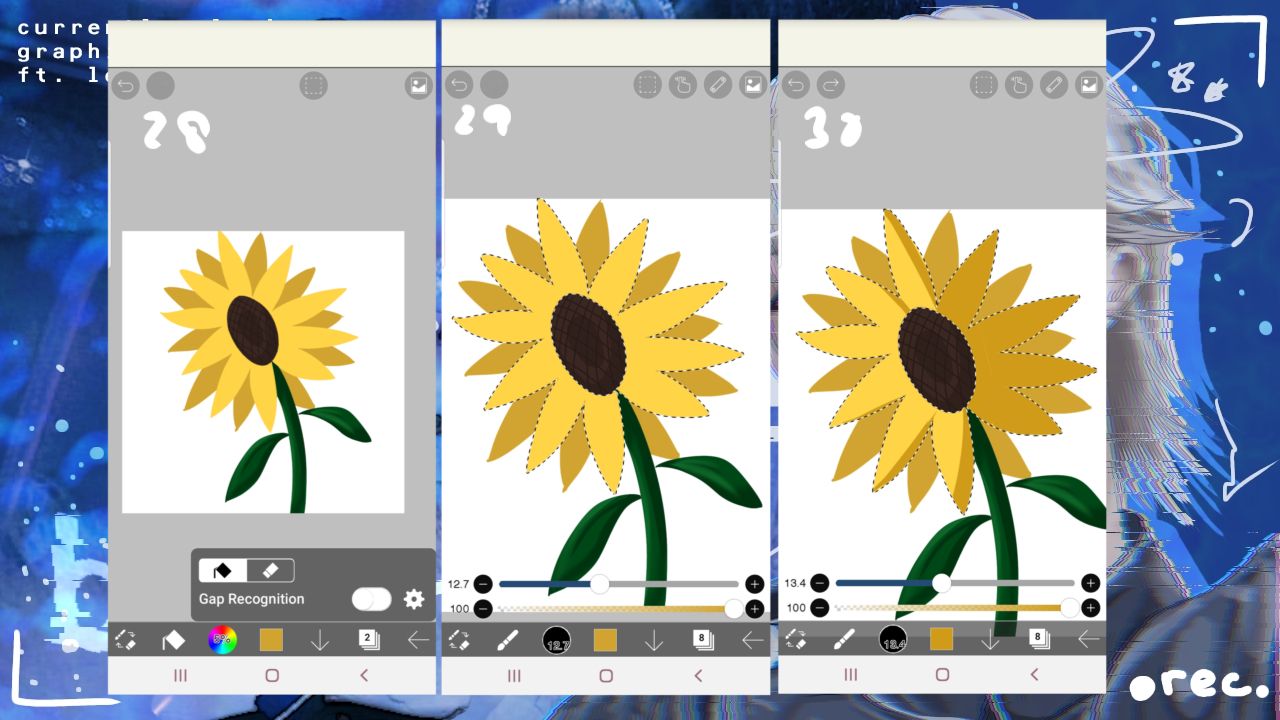
28. Fill them in with the bucket tool
29. Select the brighter yellow ONLY
30. With a darker color, draw nearly half of the flower with it on the darker side. Don't forget to do it on a new layer and clip it
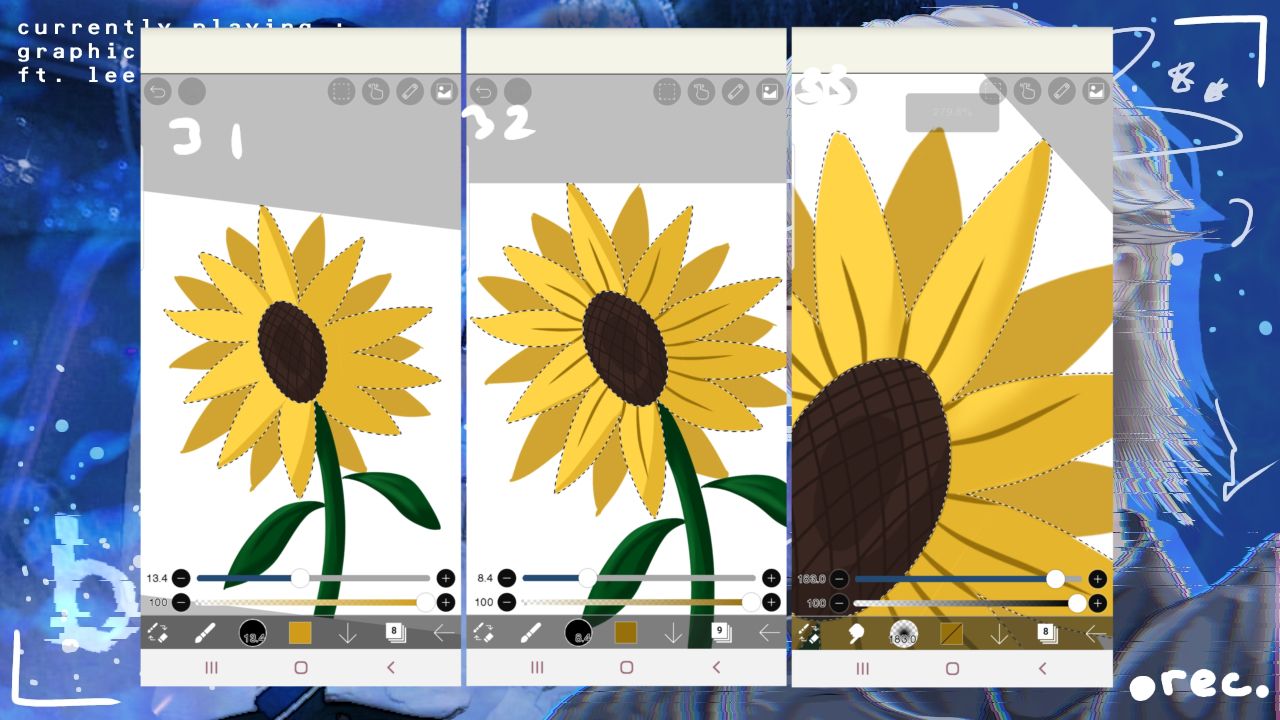
31. Lower the opacity of the shadow
32. ADD A NEW LAYER, then with brown, draw a line in the middle of each petals
33. Go back to the layer before and smudge it
* OH GOD I FORGOT TO MOVE THE PICS TO THE CENTER I'M SO SORRY I WAS TIRED YESTERDAY WHEN I MADE THIS
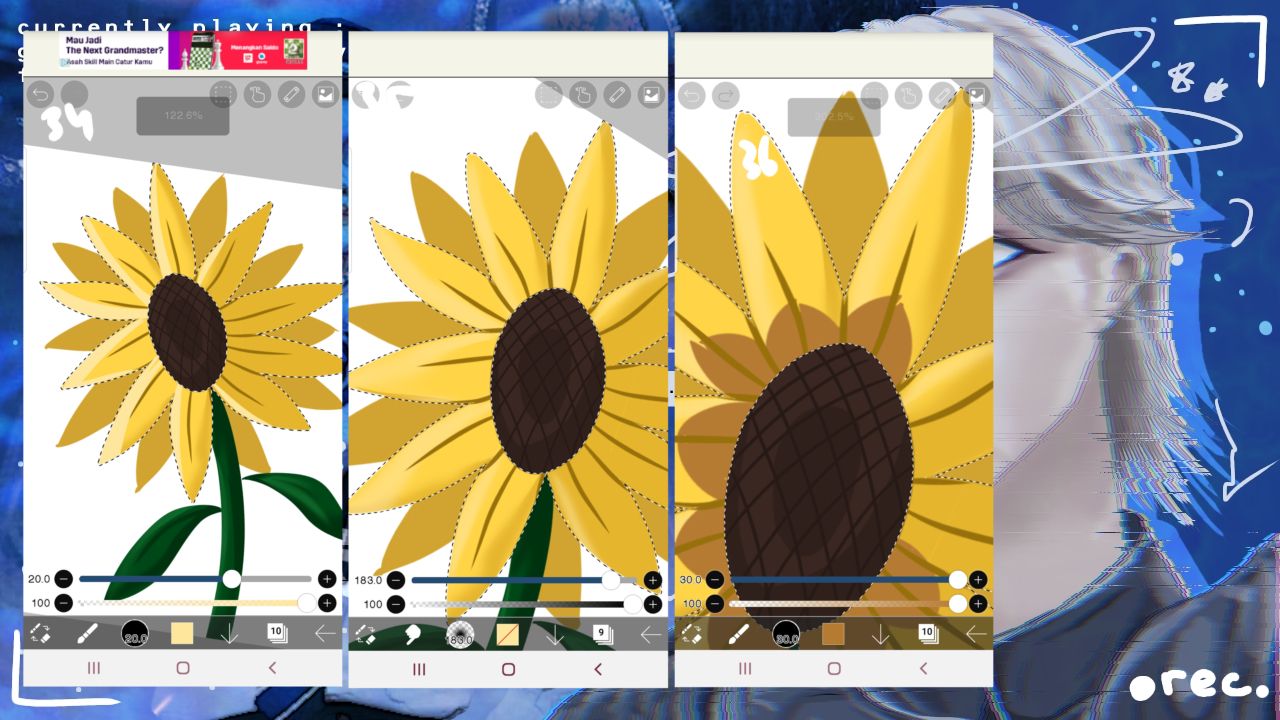
34. With a lighter yellow, draw lines on the brighter side on each petal that hasn't been covered with the dark color
35. Smudge it a little bit and lower the opacity
36. With orange, just draw random blobs on the inner part of the flower (it doesn't have to look perfect since we're just going to smudge it later)
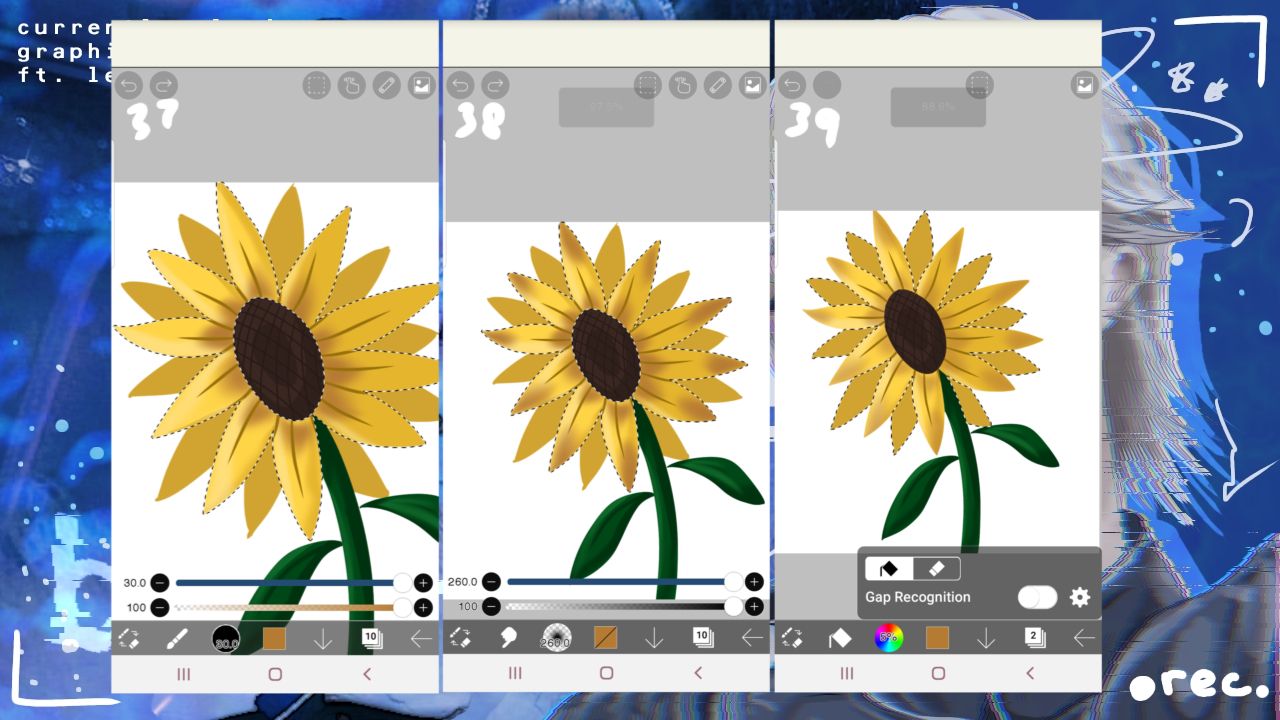
37. Smudge them blobs pals
38. Do the same thing on the ends of the petals
39. Lower the opacity of the orange then remove the selection. After that, select the darker petals behind
*DEAR LORD IT'S OFF CENTER AGAIN. WHAT'S WRONG WITH ME
40. Repeat step 30-39 but with darker colors (I'm already nearing the 20 image limit 🙂)
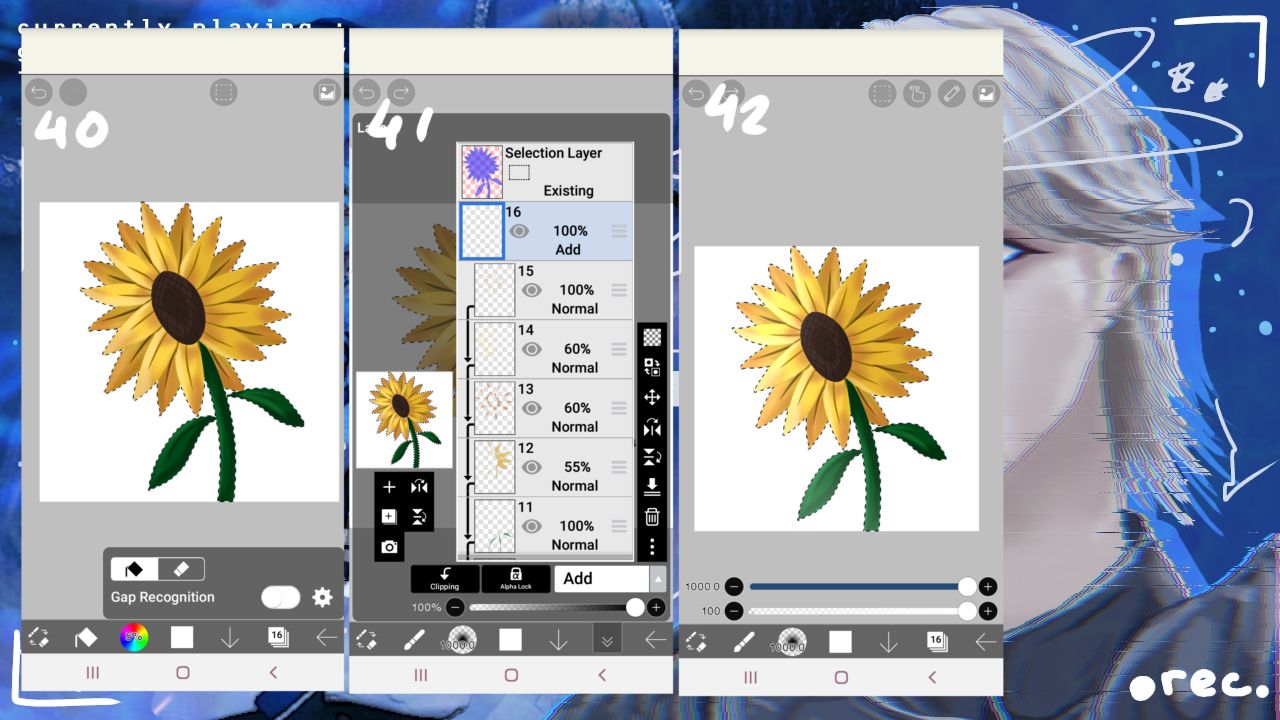
41. Now, select the WHOLE flower (see the pic above). Then, add a new layer on top of the flower and change the blending mode to Add, no need to clip it.
42. Change the brush to airbrush, make it white, then just lightly brush on the lighter part of the flower so it looks extra shiny
----- - --- (❁´◡'❁) --- - -----
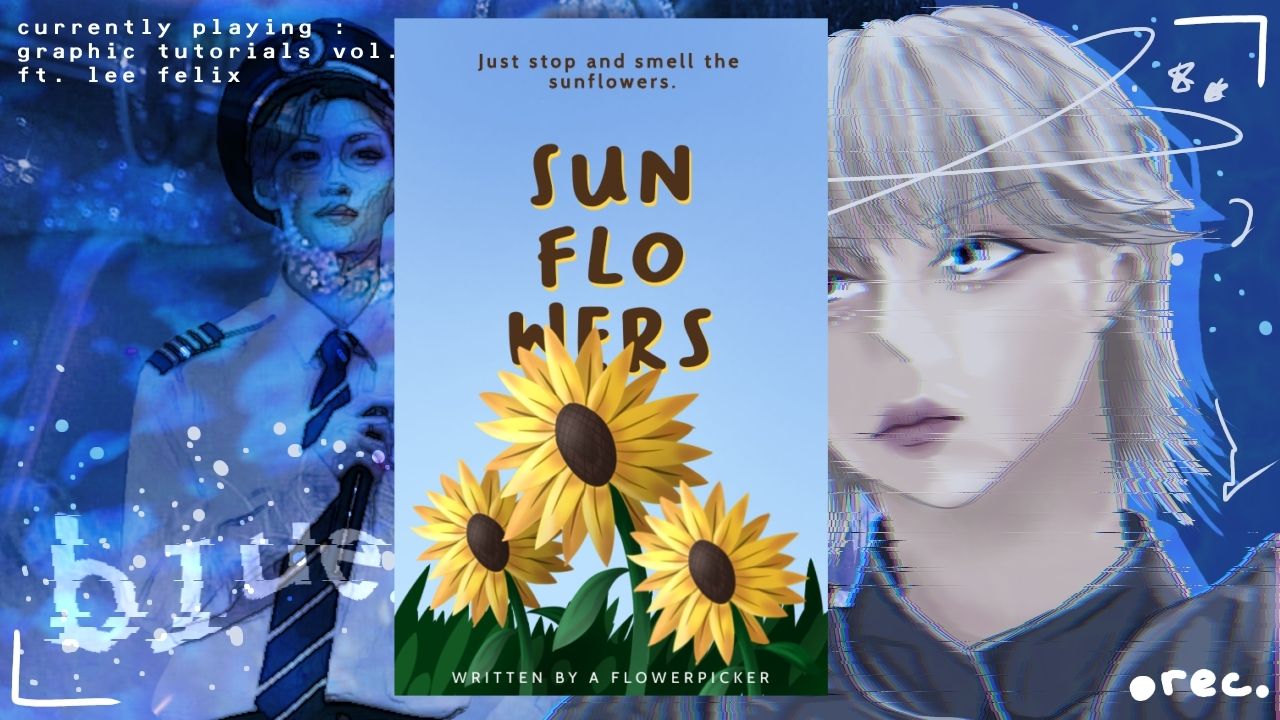
Done!
----- - --- (❁´◡'❁) --- - -----
f o n t s
- title : bakso sapi
- subtitle and author : cabin regular (I added a stroke for the subtitle so it looks thicc)
----- - --- (❁´◡'❁) --- - -----
Even though it's 42 steps long, it's quite easy as it is very simple and repetitive (making me run out of words to explain the same thing over and over --- it's basically just draw - smudge - draw - smudge over and over).
I hope the pictures are still clear when you zoom in, because I feel like it's too small.
Also, I drew this with my fingers so no more excuses people -_-.
And here's some tips for drawing with your fingers (and make them look less shaky) :
- use longer, slower strokes at a time rather than short choppy ones. If you don't like how it looks just undo then repeat until you're satisfied
- don't zoom in too much when you draw, especially long lines. It makes you see the whole drawing better, which explains why every screenshot I show in this book is always zoomed out
- make sure your elbow is steady and still (you can lean on a table or something else-- I like to lean on my knee), because trust me it works wonders and makes your hands less shaky
----- - --- (❁´◡'❁) --- - -----
Anyways, my first book almost has 100k reads already-- HOW? I'll save my speech for later lmao
Thank you for reading and I hoped you enjoyed this tutorial! Leave any suggestions ♡♡♡

Bạn đang đọc truyện trên: AzTruyen.Top